 On Sunday of last week we were staying out in Port Angeles so I decided to do the Lake Angeles-Heather Park loop trail. I’d done this once before, maybe two years ago, and the weather was spectacular – especially for so late in September. This was partial consolation to the cancelling of our Constance trip, which still remains unclimbed…by me.
I decided to bring along my new Garmin 910xt along with the heart rate monitor. I wasn’t expecting to feel particularly energetic, given it was my fifth consecutive day of exercise, and that I’d done a swim-bike brick the day before. But I was curious as to how hiking compared to other forms of more intense but shorter duration exercise on the device.
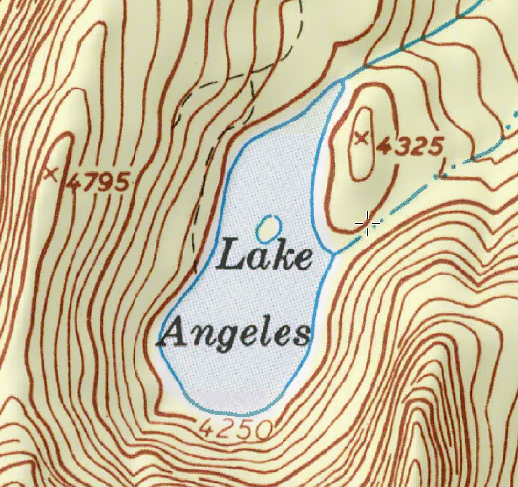
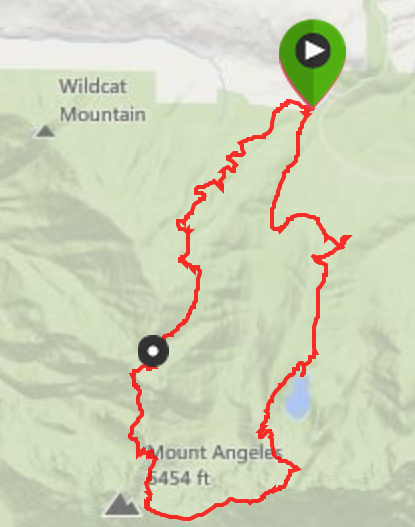
The trail leaves from (and returns to) the Heart O’ The Hills trailhead. With my trusty Garmin watch functioning, I was able to get precise information on position, distance, heart rate, elevation, etc. The sign at the trailhead indicates that Lake Angeles is 2.7 miles, which is not correct. Both my topo map and my watch pin it rather at 3.3 miles. I had forgotten to set the barometric altimeter on the watch, so the elevation data I believe was all off by about 200 feet or so.
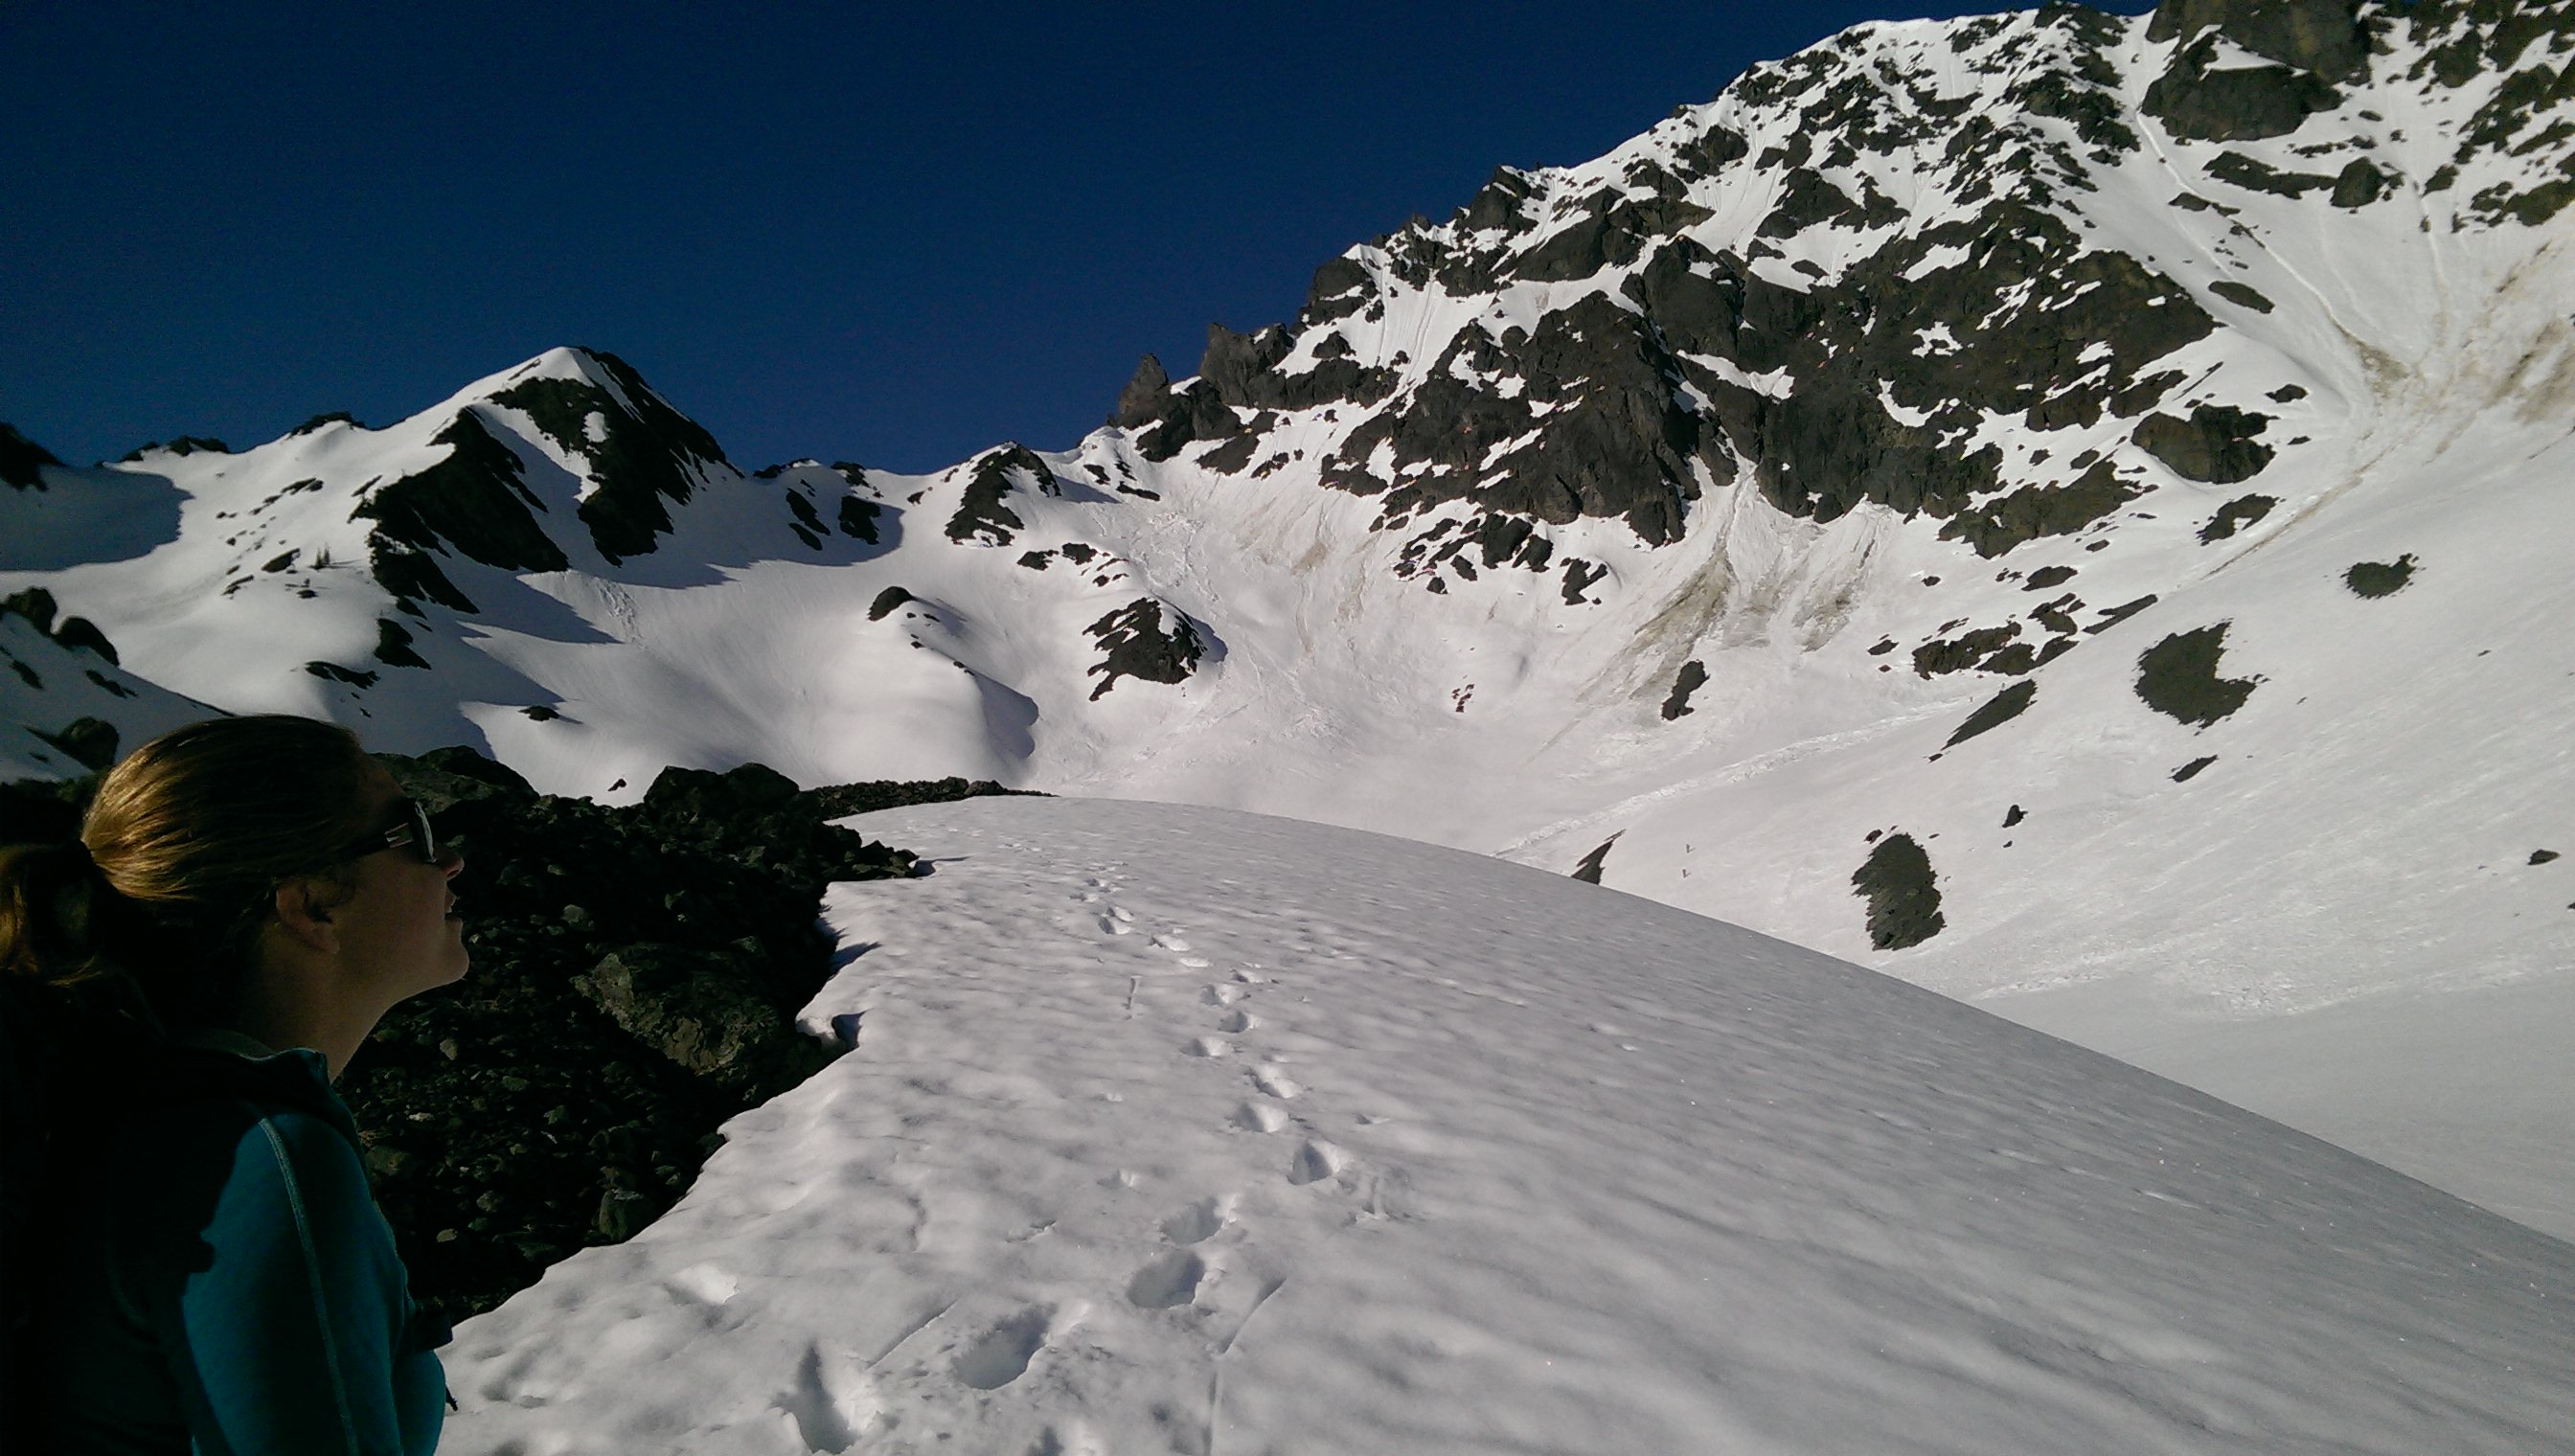
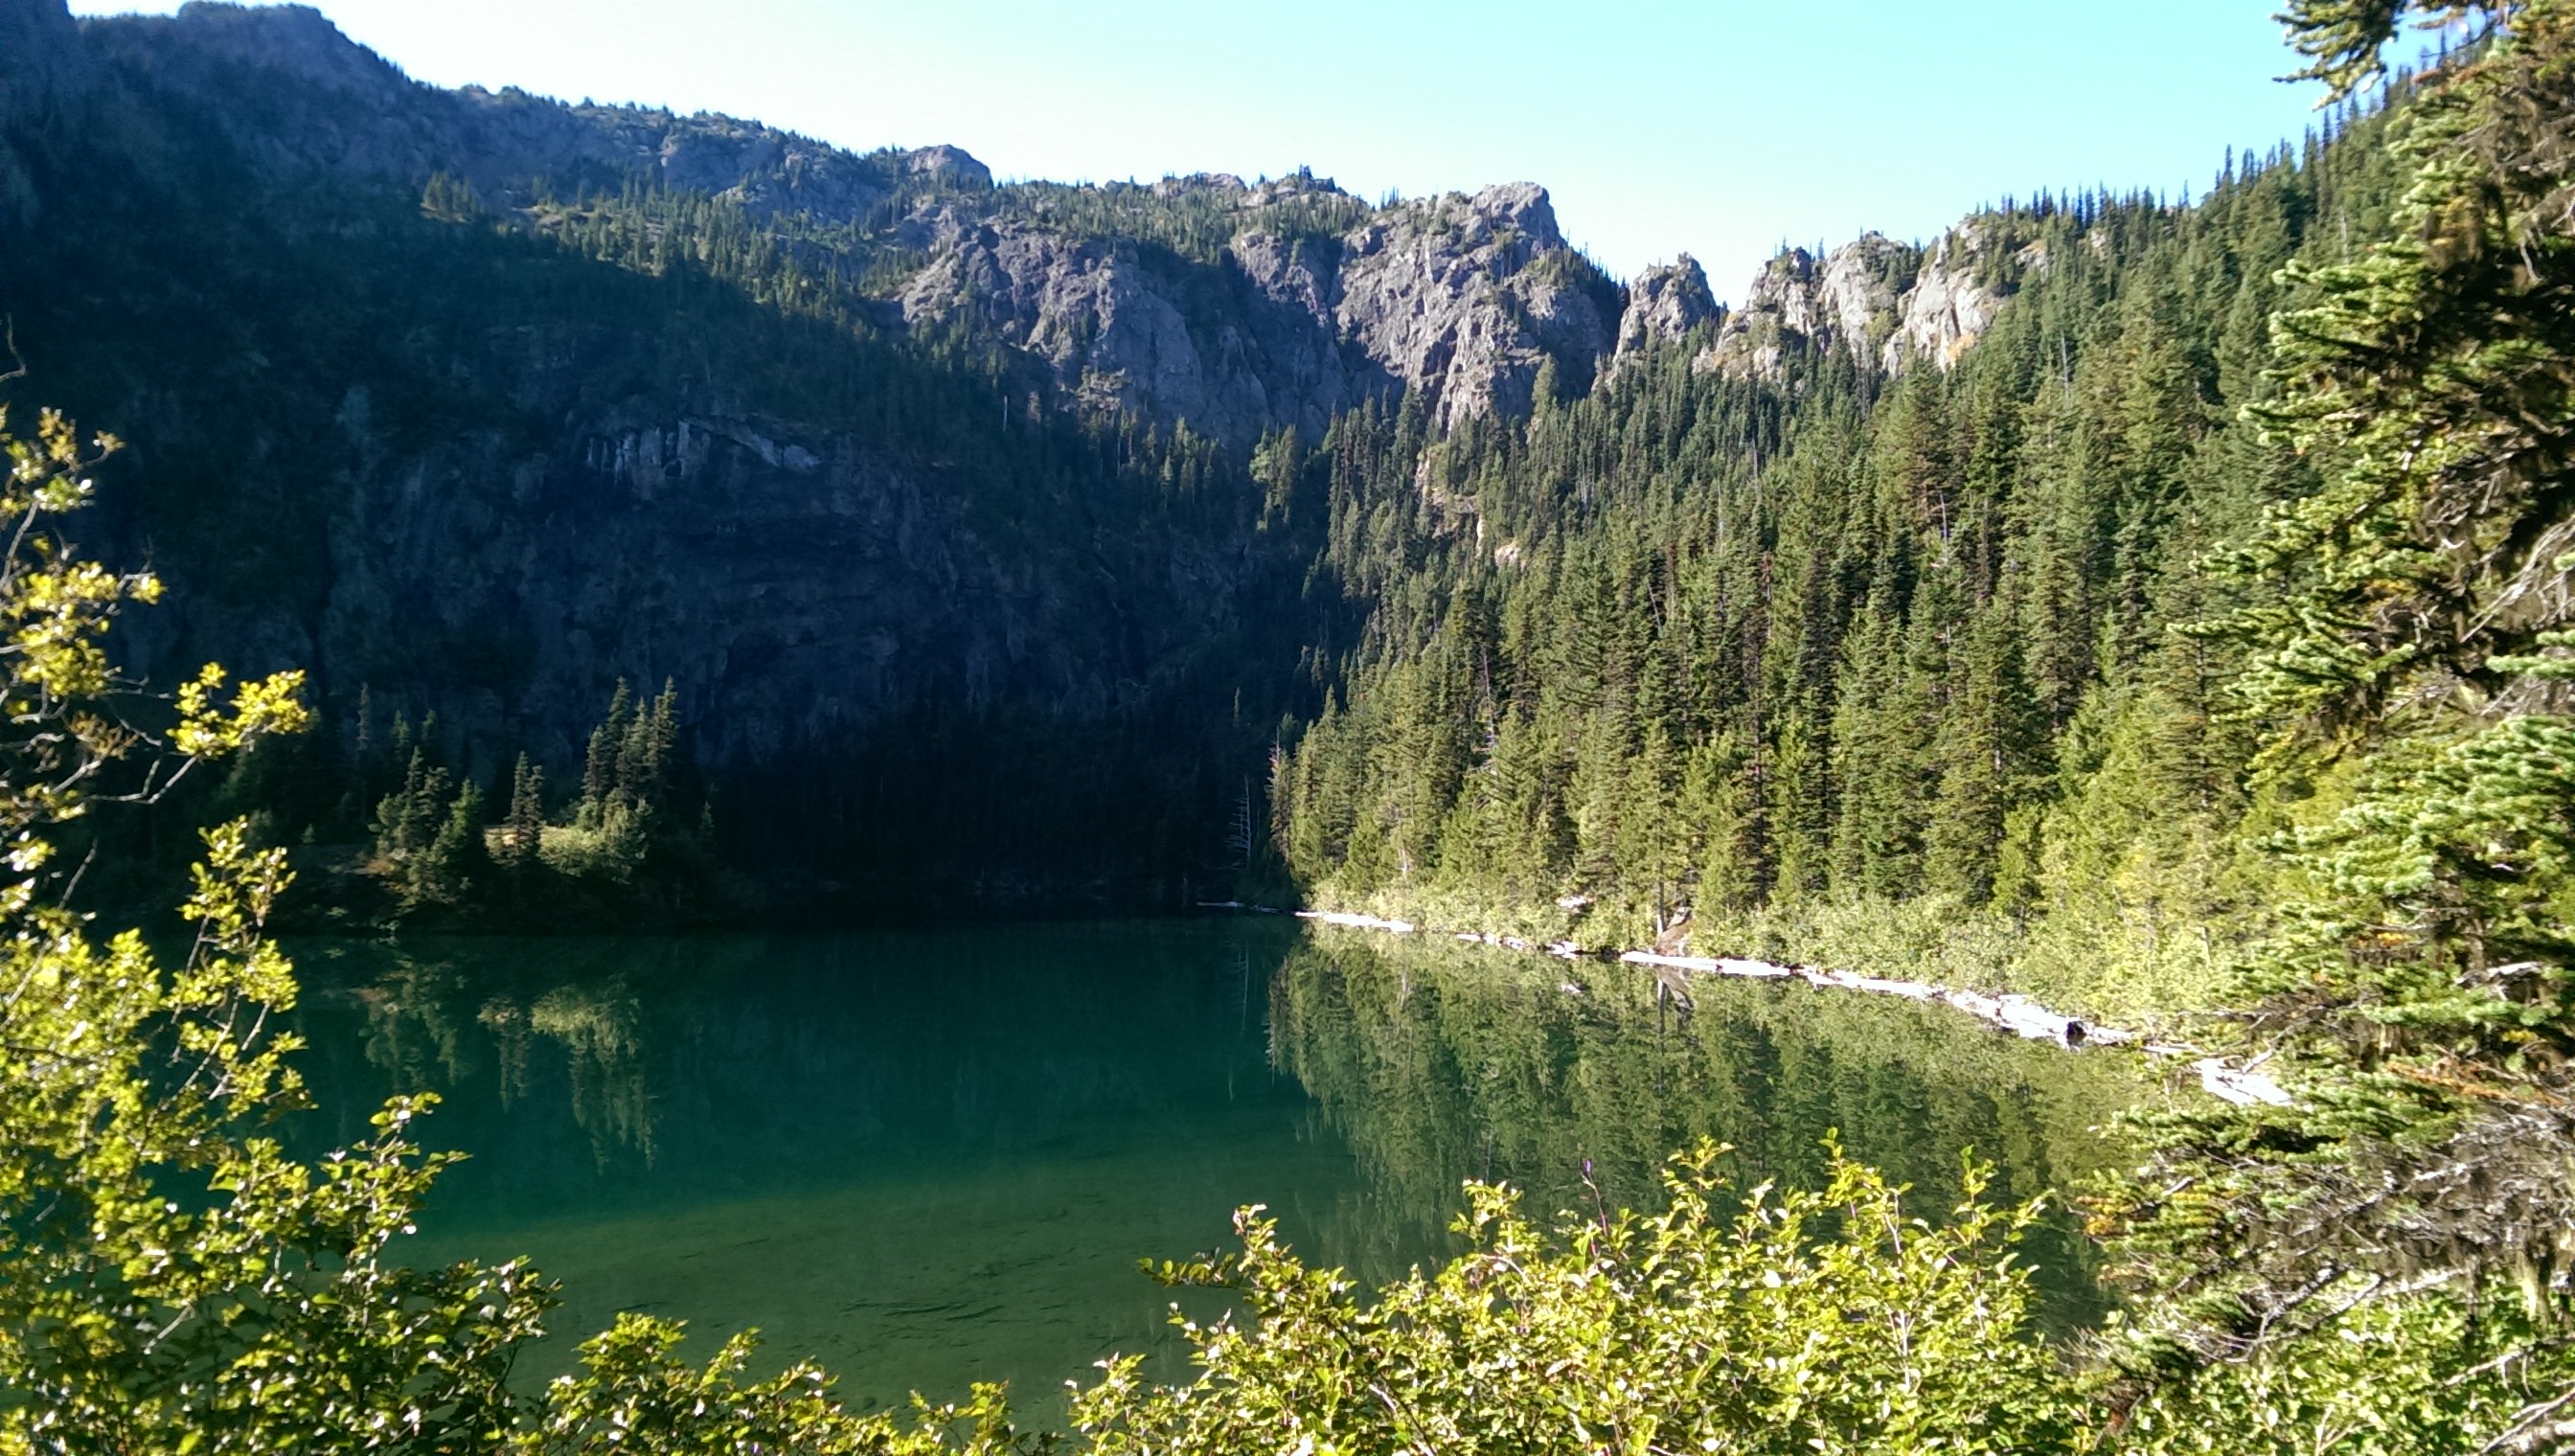 The trail ascends somewhat steeply to Lake Angeles, which was gorgeous with the sun just coming up. From there, you follow an unsigned trail even more steeply up to Klahhane Ridge. I felt strong and energetic up to the lake, but after that started to tire a bit. Interestingly, it looks as if my heart rate kept slowly increasing to the point where I took a break, and then this cycle repeated. My pack was 18 pounds (a bit heavy for a day hike, but I wanted the training and, especially since I was by myself, I wanted to ensure I could easily spend the night out there if necessary), and I was wondering if perhaps there’s no way I can move sustainably up a steep trail without having to rest. Maybe it’s a consequence of my SUV-like metabolism (lots of power, but not great on the fuel efficiency).
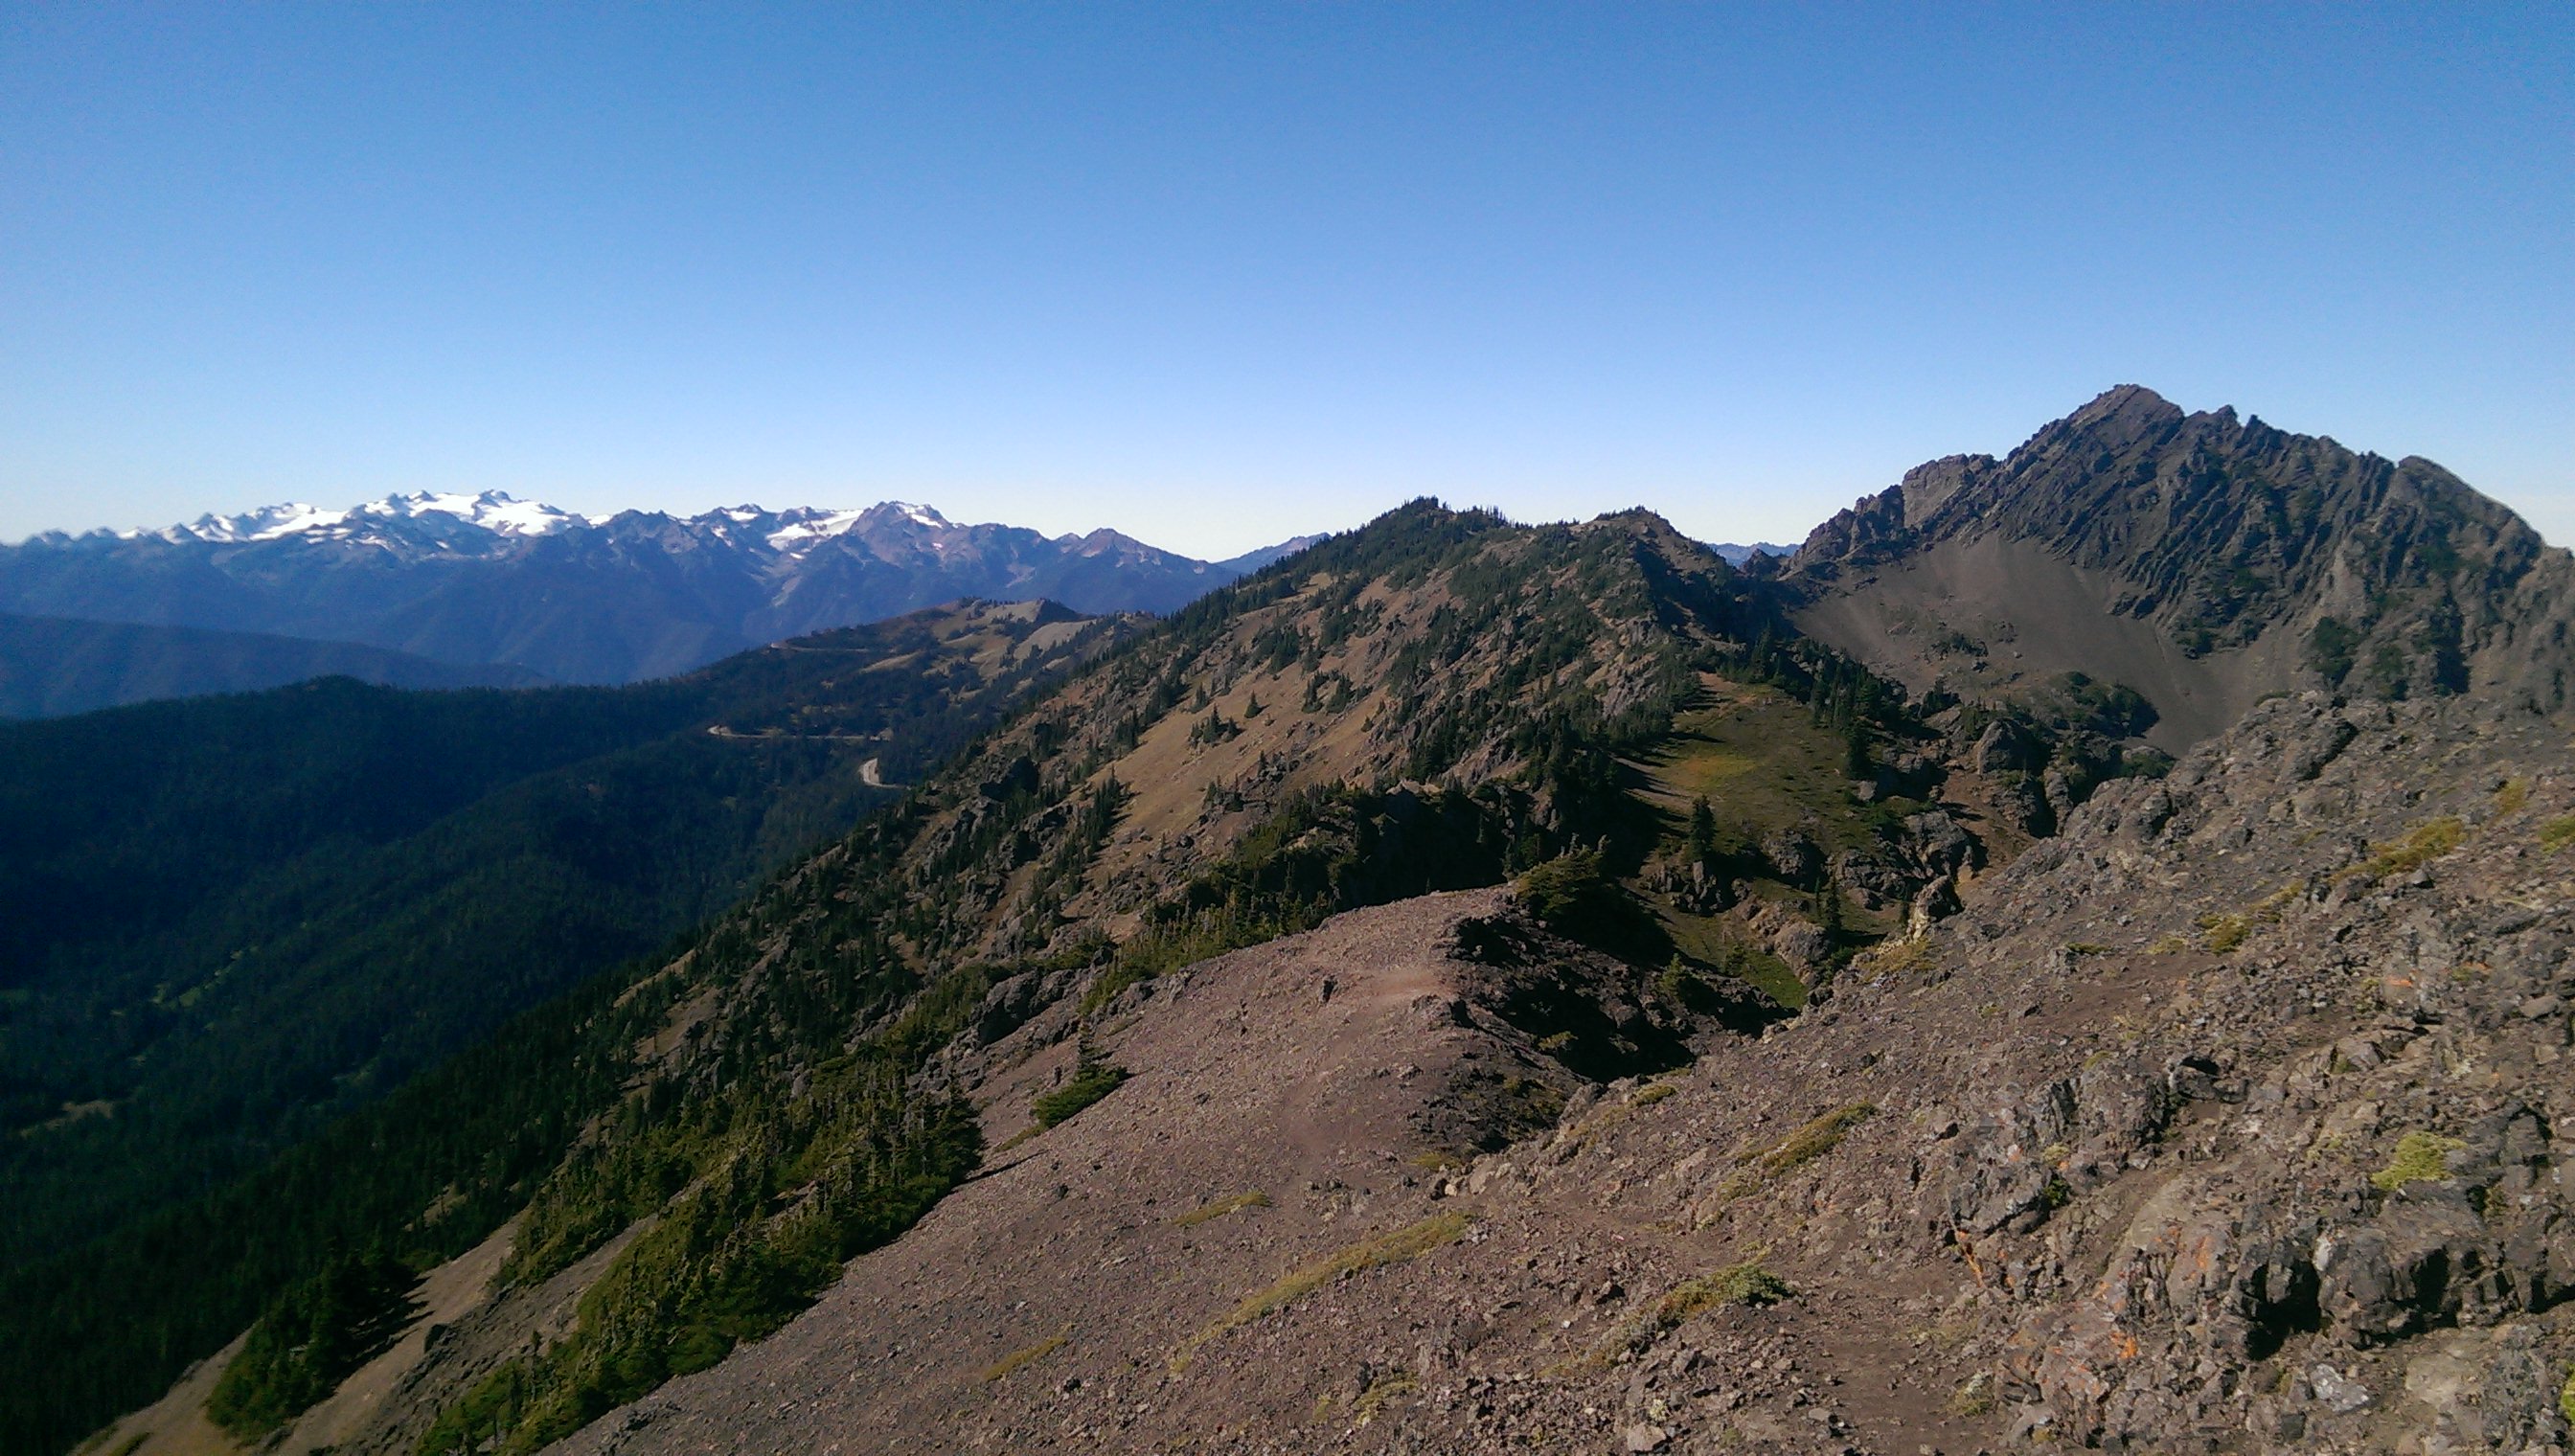
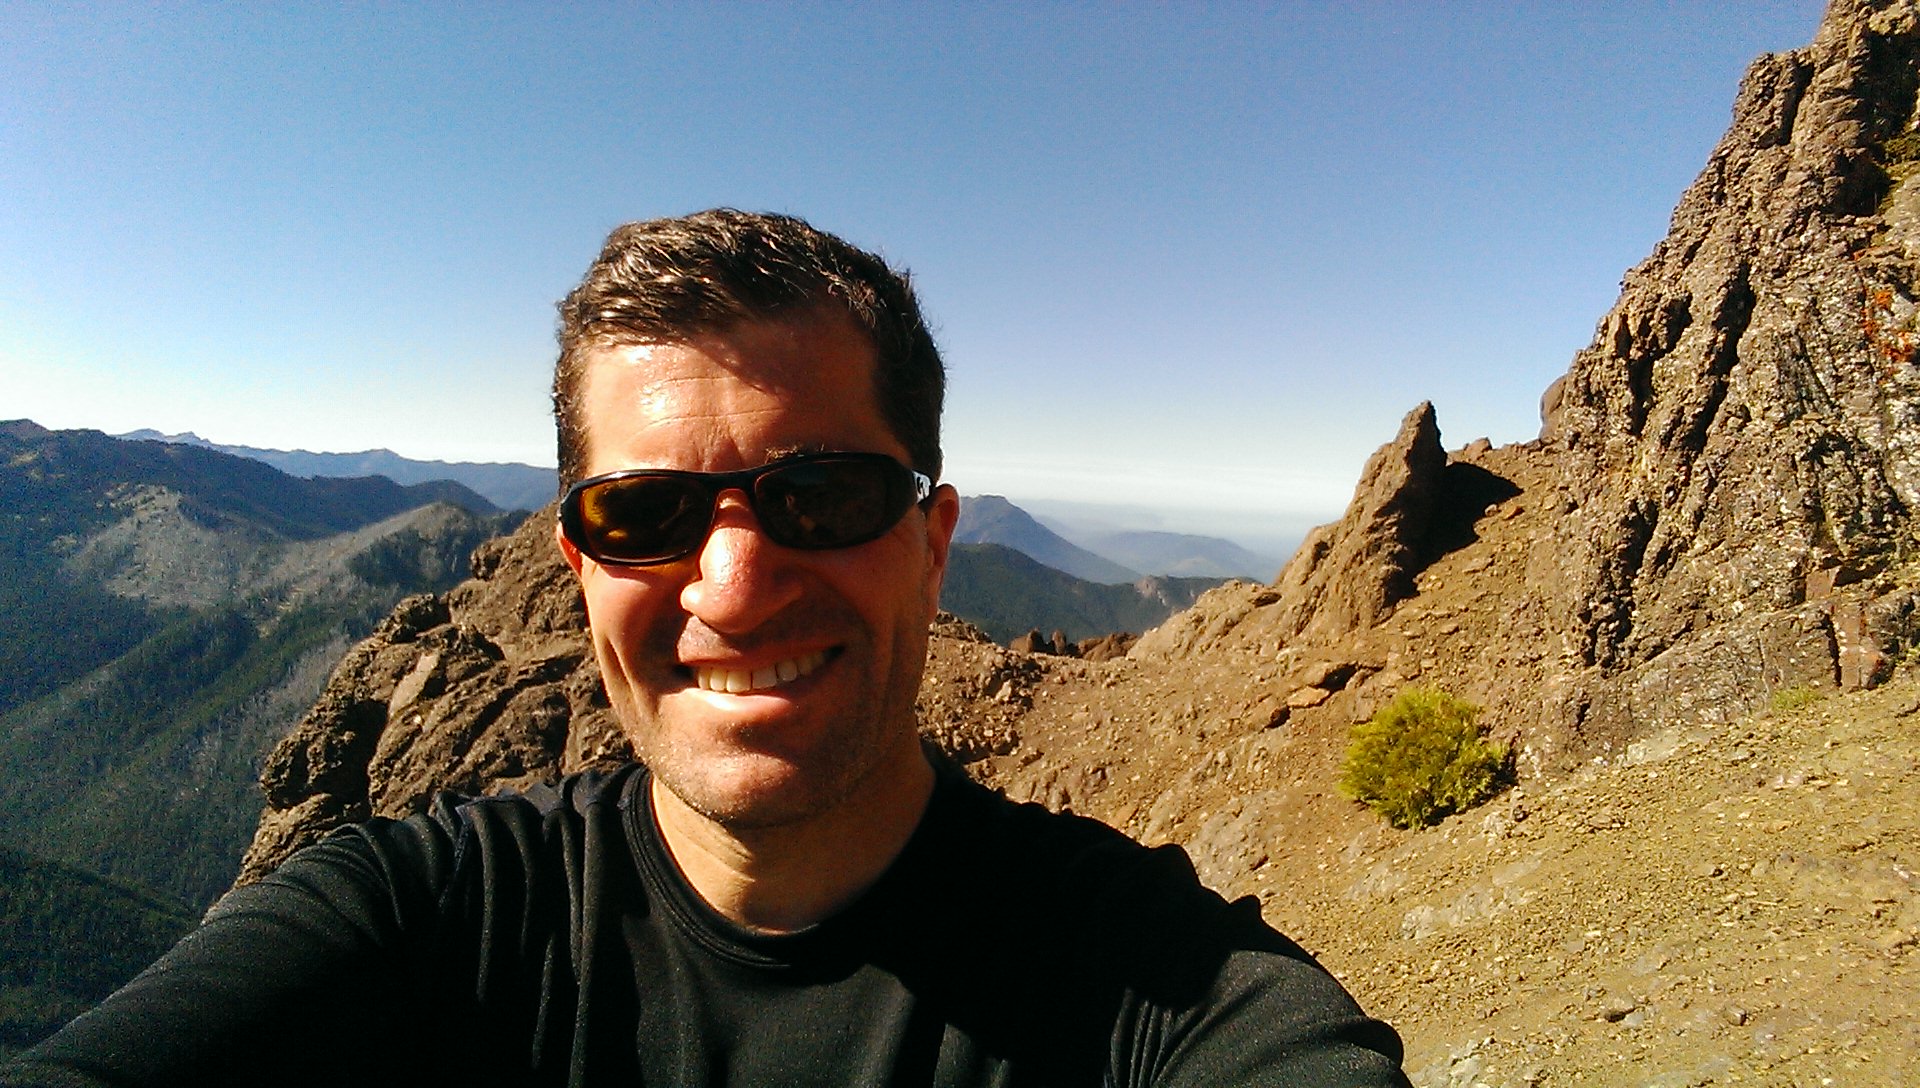
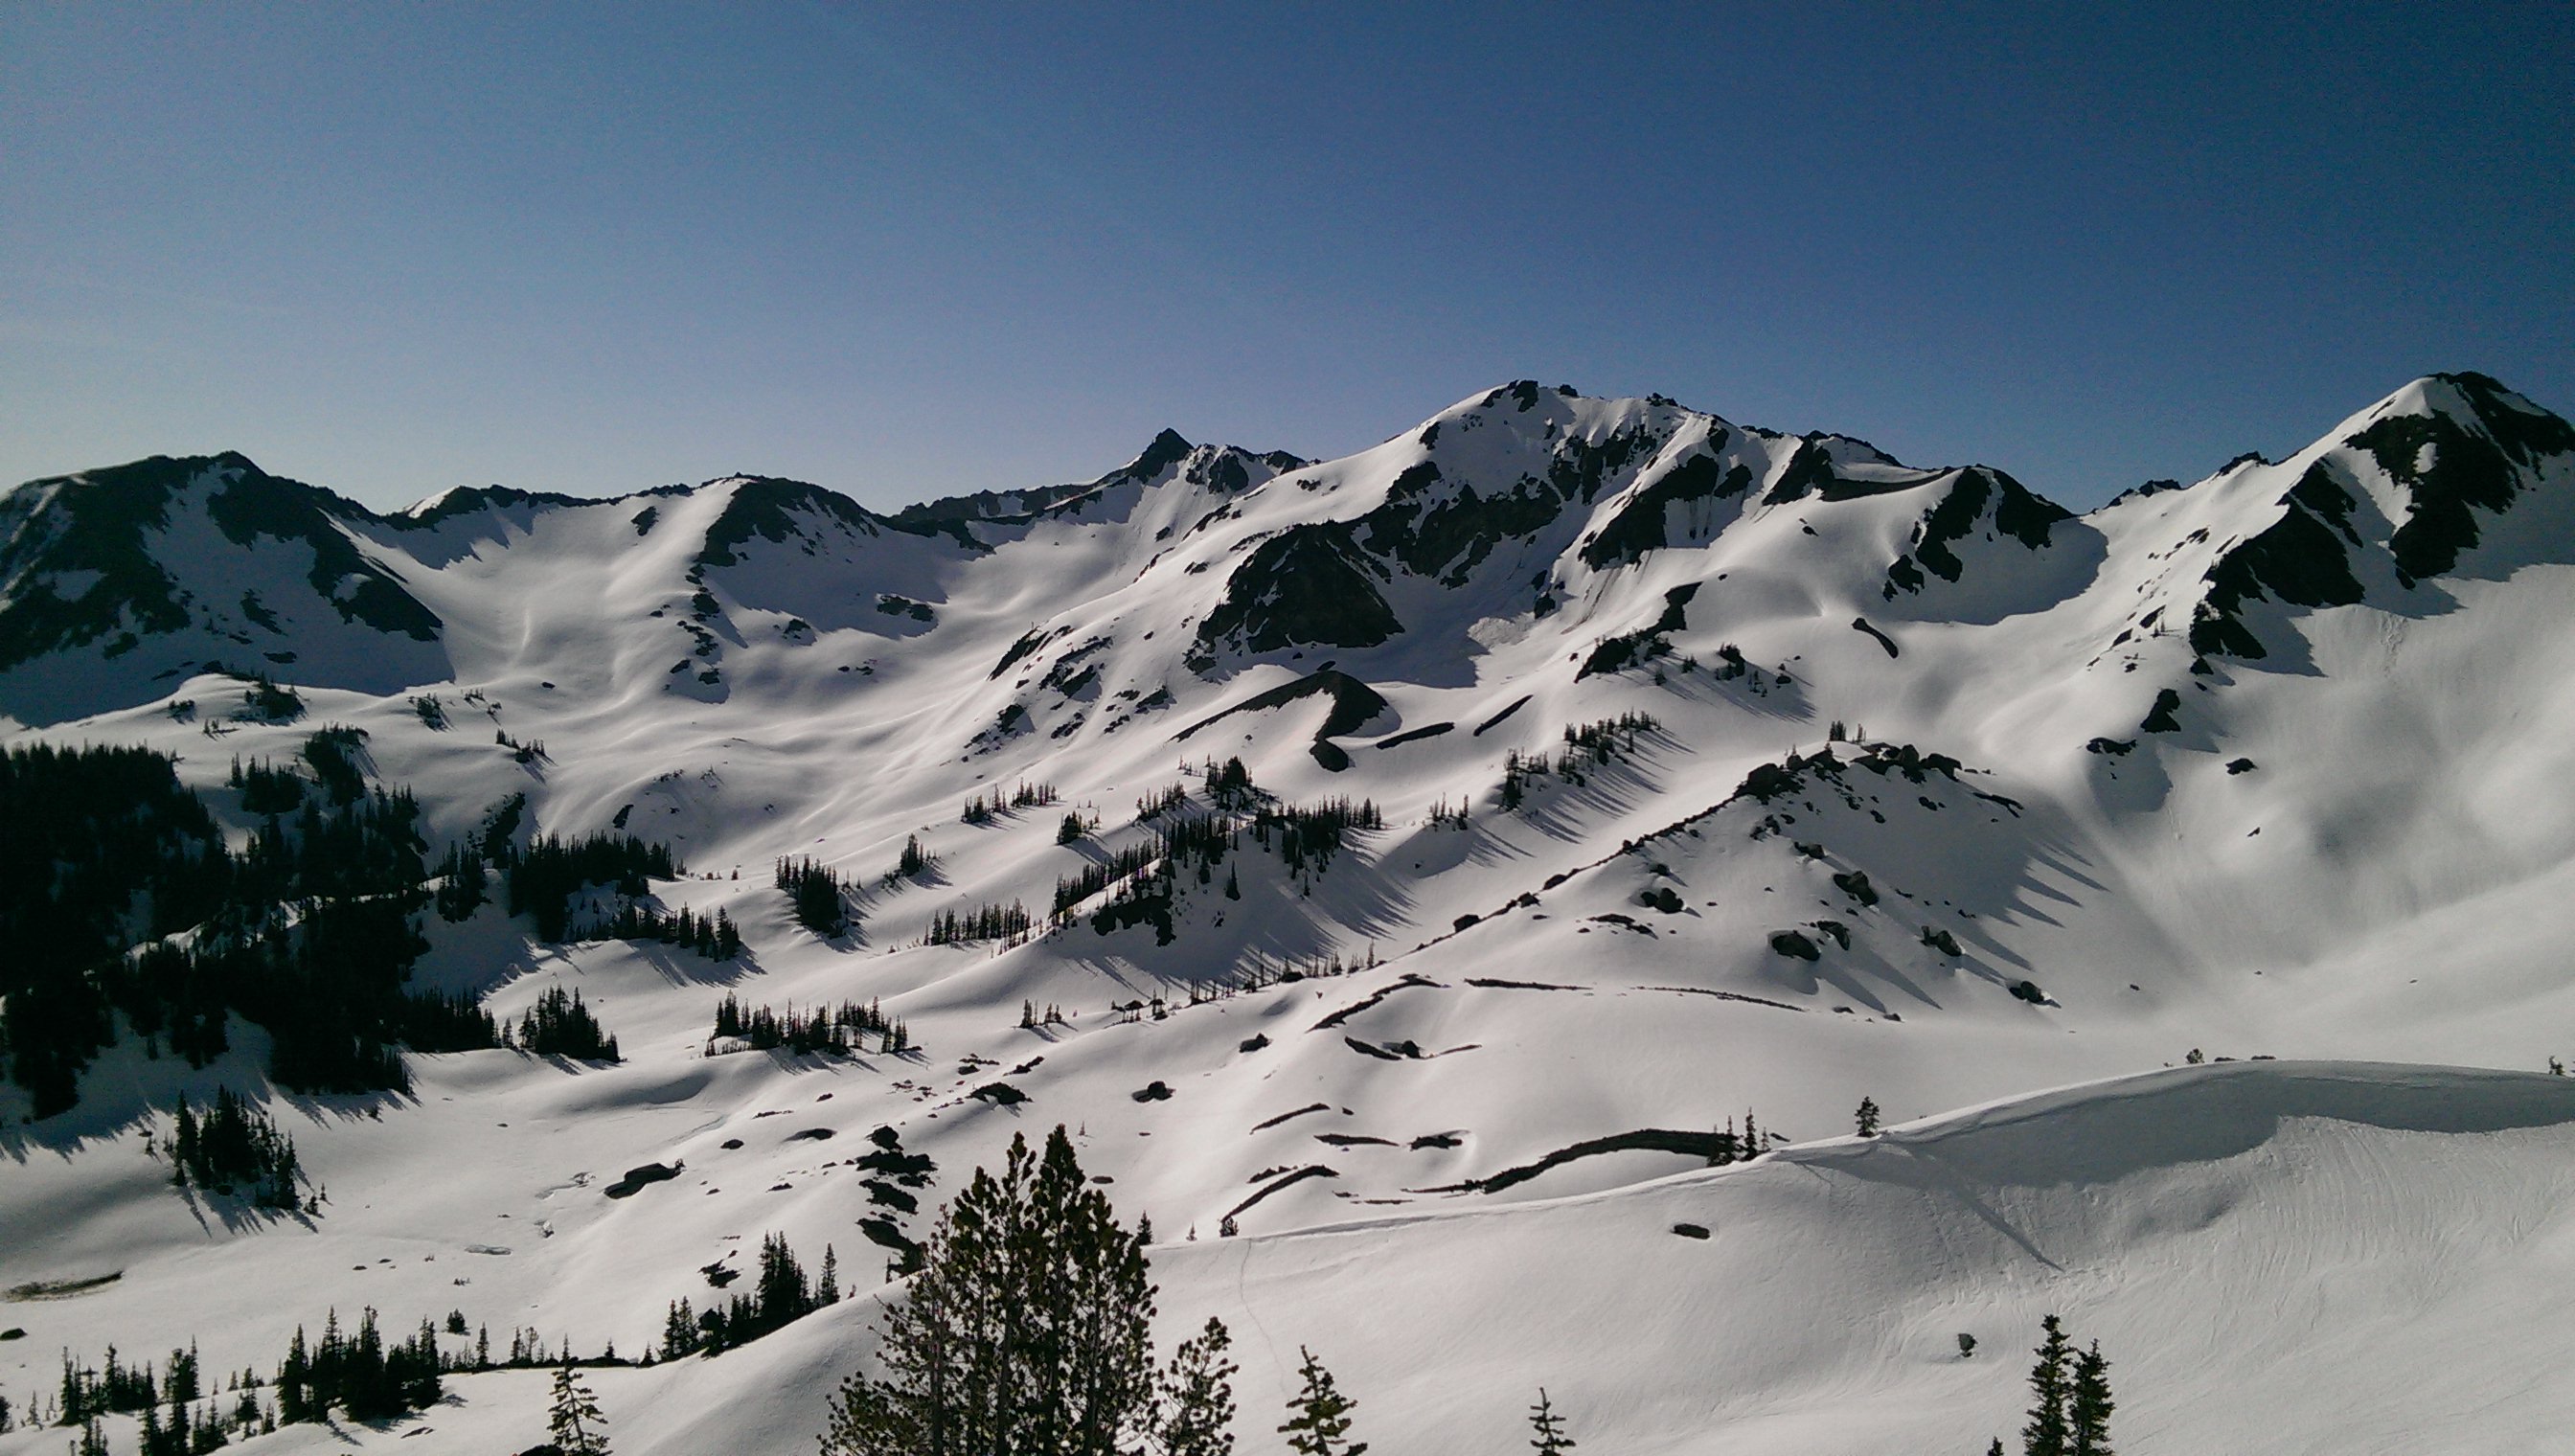
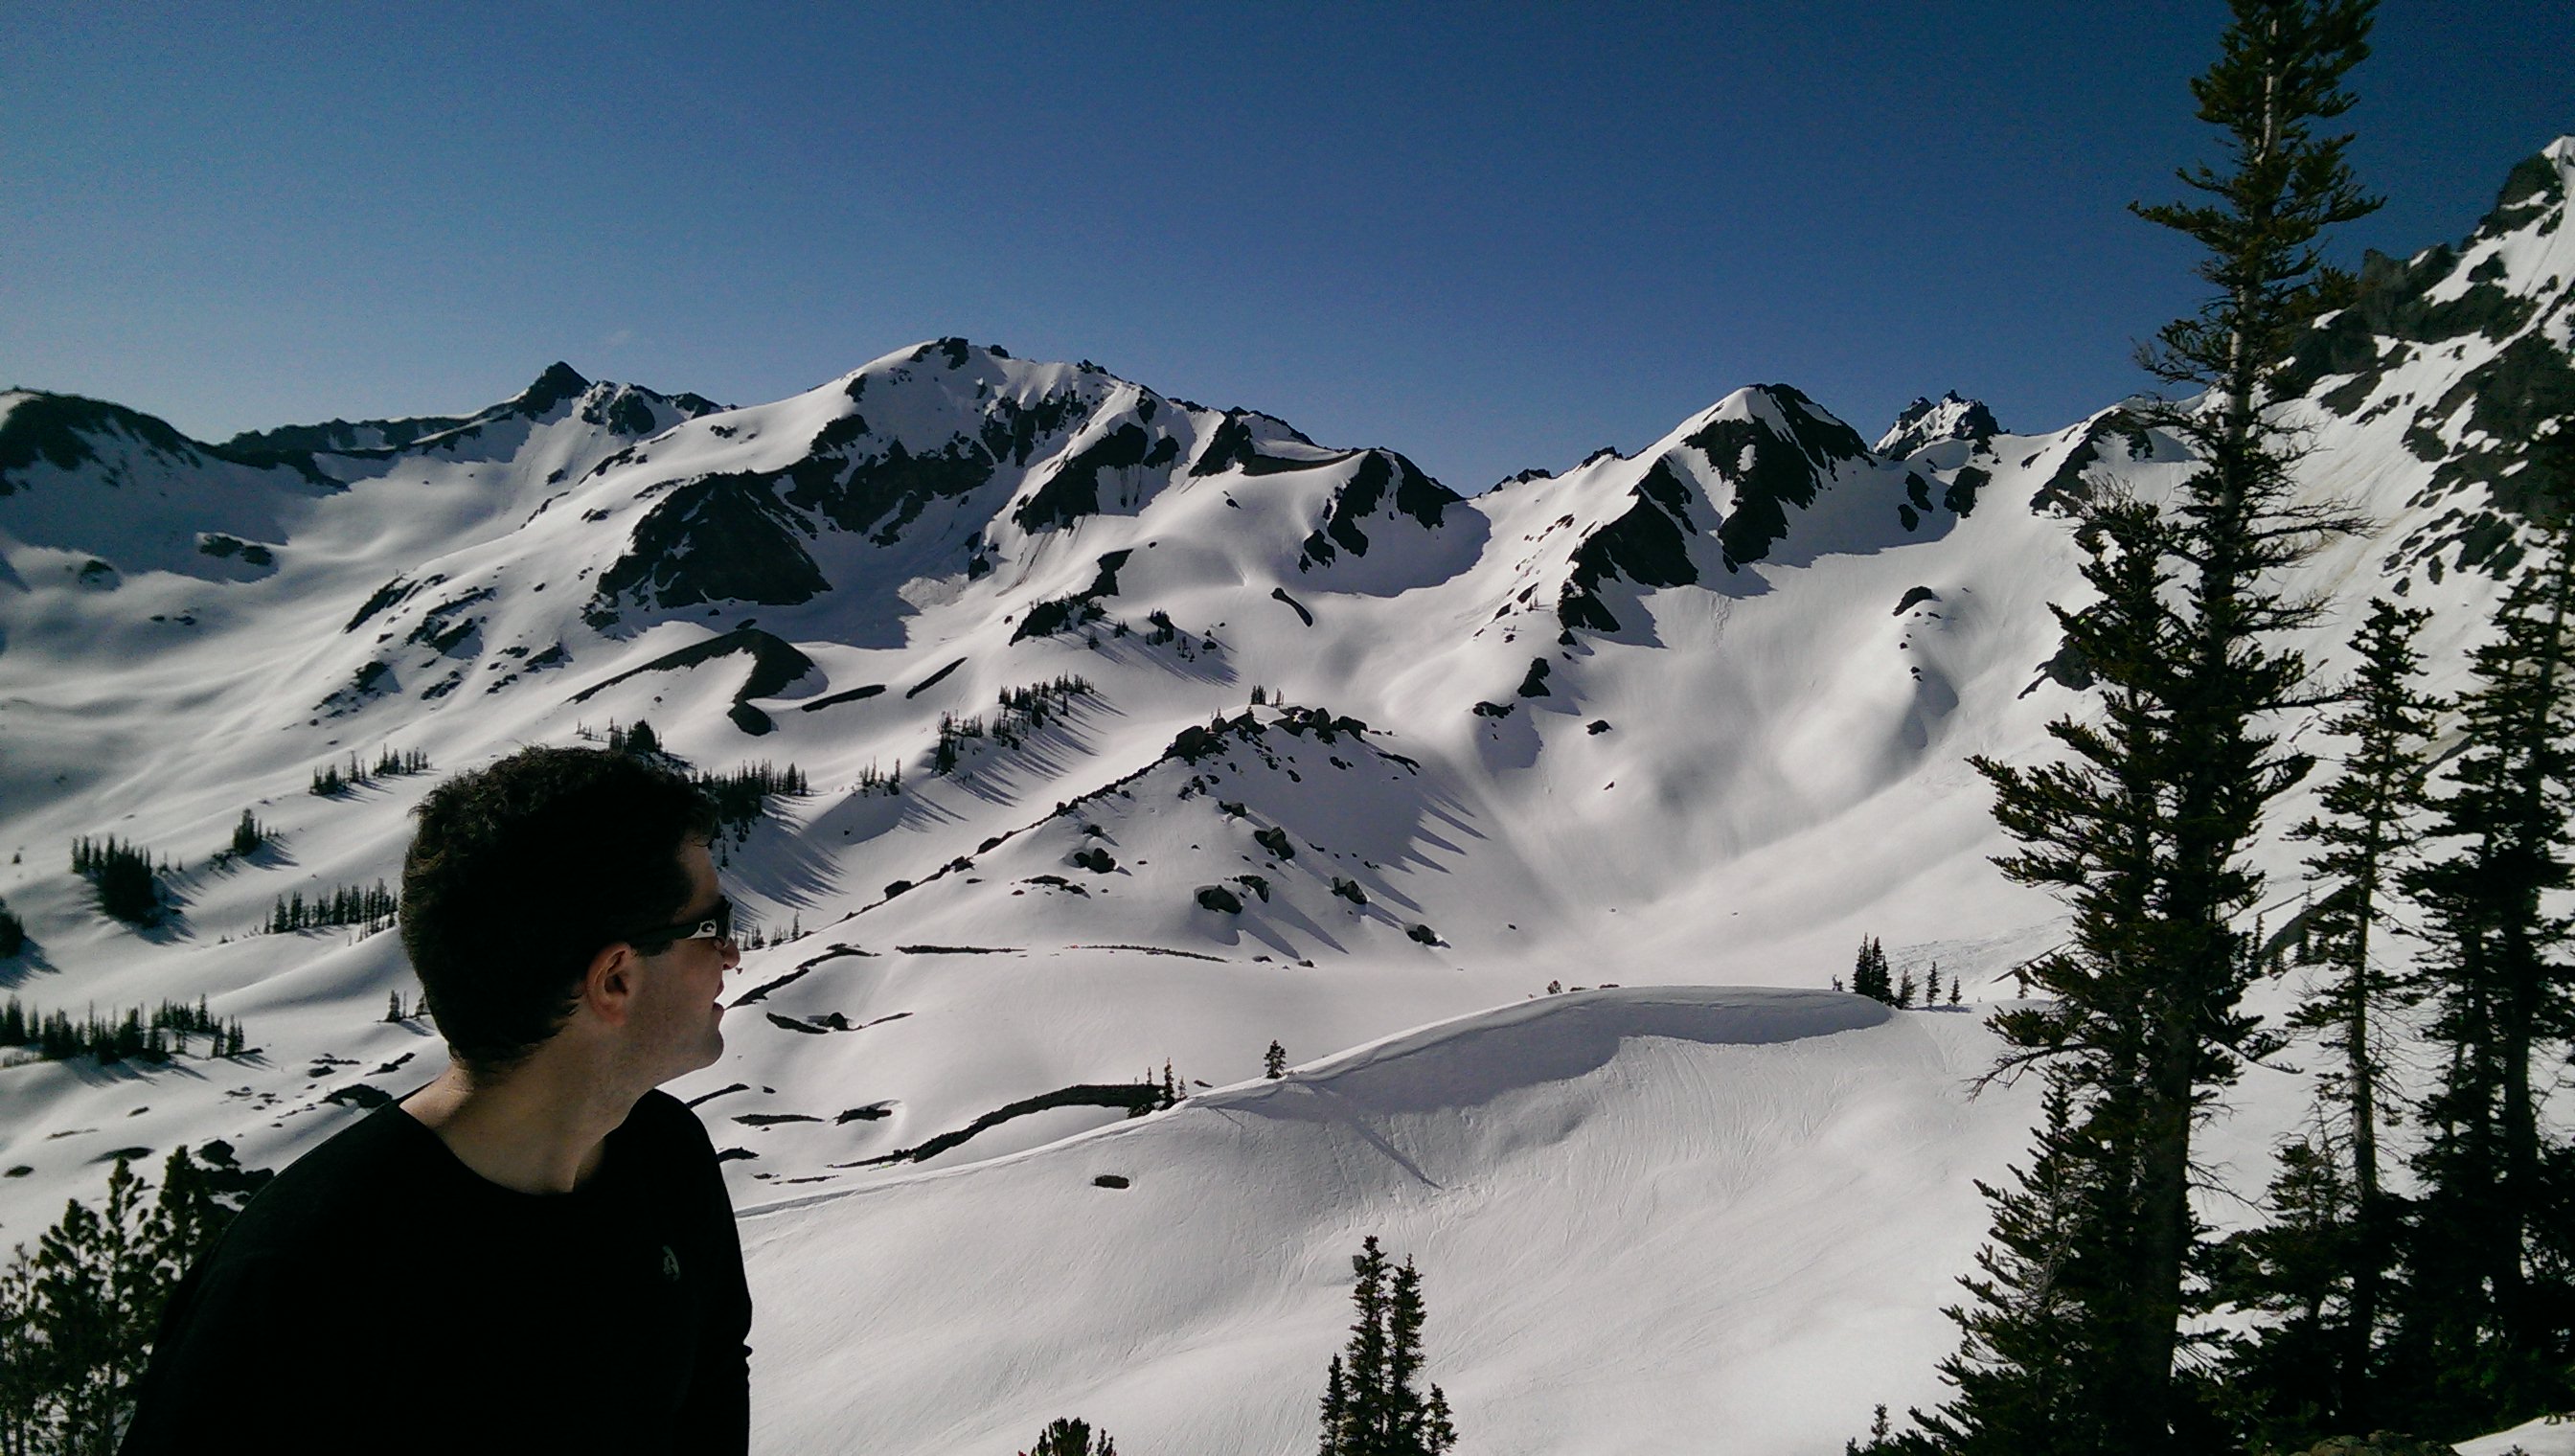
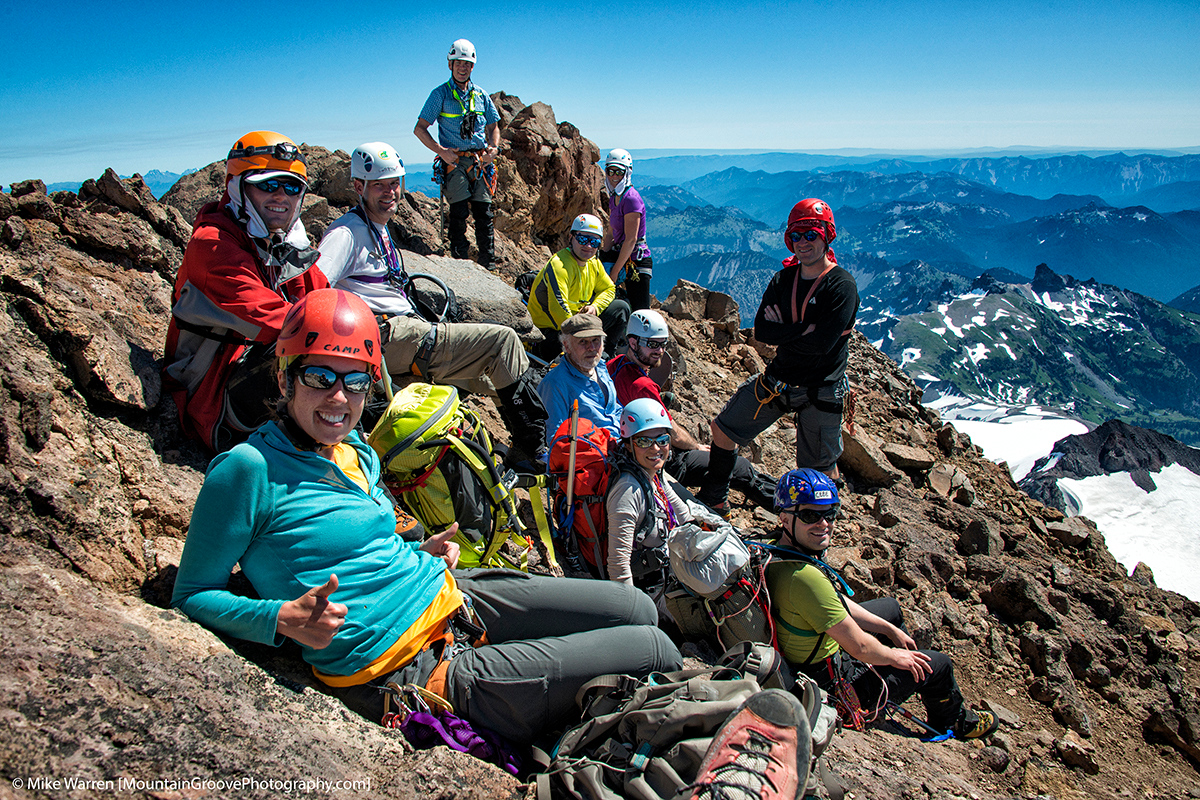
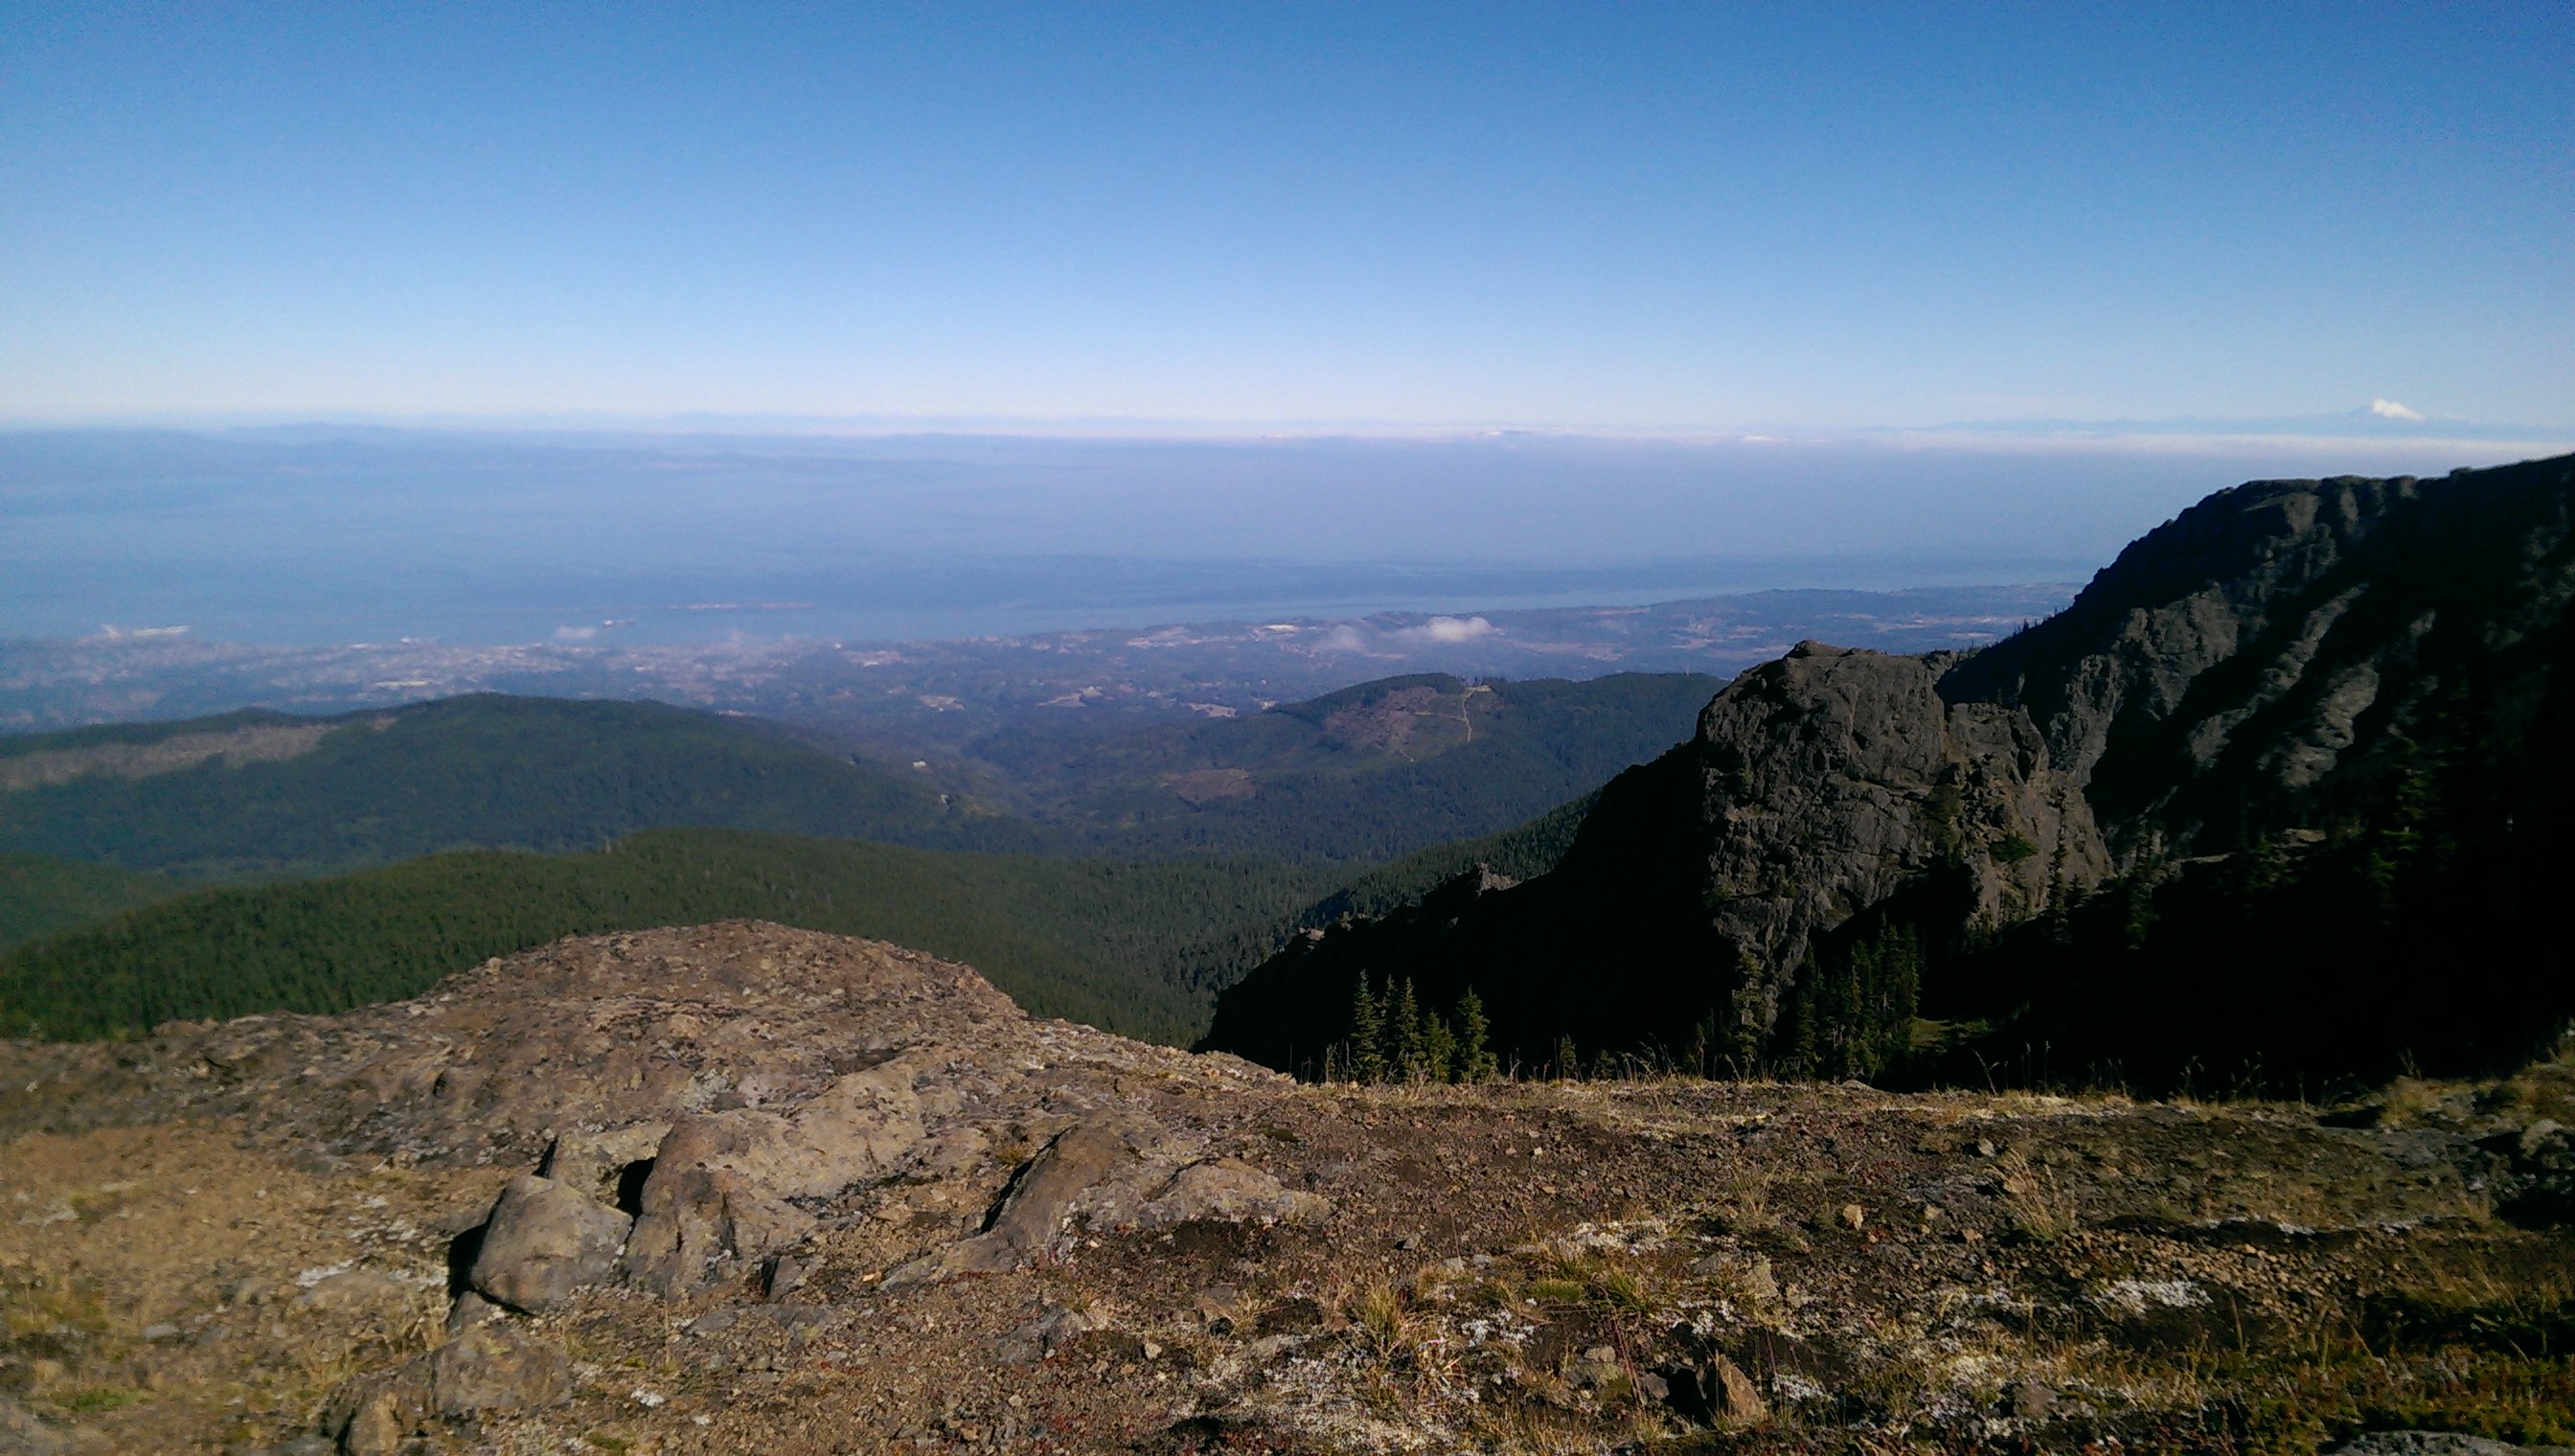 From the top of the ridge, you get spectacular views of the Strait of Juan de Fuca (which incidentally was swam last week by several friends), Ediz Hook, Dungeness Spit, Orcas Island, Mount Baker, and even up into the Coastal Range of BC. On the other side, Olympus stood majestically among many hundreds of miles of wilderness. It’s rare you can see it so clearly – not a single cloud in the sky! One day I’ll climb it – along with Constance, it’s at the top of my list.
The entire trail was essentially deserted. I saw one other couple (interestingly, friends of the family) doing the same thing, and a couple of people where the trail intersects with the switchbacks coming up from the road.
 I was wearing my leather hiking boots instead of my mountaineering boots (Scarpa Trangos) and I think my feet were happy for it. I started developing hot spots on my heels (typical for me going uphill with a burden) and I applied my new remedy – a grease-like goo that’s supposed to prevent blisters. It seemed to work, though I still had a bit of residual pain.
The trail goes right under the shadow of Mount Angeles (when I climbed it earlier this summer, it was raining and wet, with 360 degree views…of clouds). There’s quite a bit of up and down as you cross a narrow pass north of the mountain and contour around the other side. There’s one additional steep-ish section leading to Heather Park and then it’s all downhill back to the trailhead.
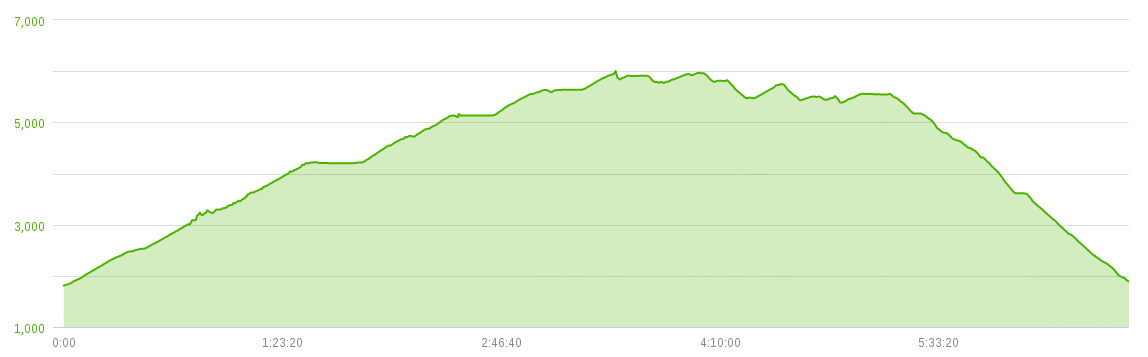
 The total milage according to the Garmin was 12.5. Although the elevation gain from the trailhead to the highest point is about 4,200 feet, with all the up and down my watch thinks the total vertical was 6,800 feet. That seems like a lot of up and down to me, but maybe it’s correct. I think the relative elevation data should be accurate, so if that’s the case it’s on par with one of the more arduous climbs (like Whitehorse) and thus a great conditioner.
Without my mountaineering boots, everything actually felt pretty good during the several last miles. But one thing the Garmin does allow you to do, and I’m not sure how I feel about this, is tick off the remaining milage bit…by…bit. It’s like watching the last few tenths of a mile click by on a treadmill. I think it’s marginally better than not knowing at all, since you feel a psychological satisfaction with every 1/10 mile…but I just couldn’t help glancing at the watch every two minutes or so.
 Despite many years of mountaineering, I still don’t have some things totally dialed-in. I ran out of water about 2 miles short of the finish. Not a big deal, and I could always have refilled at a stream (using my iodine tablets) if I started to feel dehydrated, but for whatever reason I just can’t seem to predict my fluid consumption well. Throughout most of the trip, I managed to stay well hydrated and well fed, but I wished I had started with 3 liters instead of 2.5. Carrying water is painful when it essentially doubles the weight on your back (especially since your pack is heaviest right at the beginning of the trip…often steeply uphill), but unless you have access to streams and have a way of purifying it, it’s just a cost of the trip.
 Here’s the interesting part – the trip took me almost 7 hours, with plenty of stops for rest, eating, and photos, and burned over 3000 calories (according to the watch), yet none of it really felt like “working out”. My brick the day before, by comparison only burned 1,600 (again, assuming the Garmin is accurate here). The lesson is that long, aerobic, fun activities like hiking in some ways get you more bang for your psychological buck. It doesn’t feel like a chore, as running sometimes (OK, most of the time) does. And if you don’t worry about pace and maintain good nutrition and hydration, you can go many, many hours without it feeling like an ordeal that must be gotten through. So rather than hitting the gym on the weekend for an hour or two, you can hike for 7 and get more (aerobic) benefit, and have way more fun.


![[img src=https://www.ehrenbrav.com/wp-content/flagallery/mt-st-helens-take-3/thumbs/thumbs_mjw_6805.jpg]35.3k0](https://www.ehrenbrav.com/wp-content/flagallery/mt-st-helens-take-3/mjw_6805.jpg)
![[img src=https://www.ehrenbrav.com/wp-content/flagallery/mt-st-helens-take-3/thumbs/thumbs_mjw_6822.jpg]35.2k0](https://www.ehrenbrav.com/wp-content/flagallery/mt-st-helens-take-3/mjw_6822.jpg)
![[img src=https://www.ehrenbrav.com/wp-content/flagallery/mt-st-helens-take-3/thumbs/thumbs_img_20140511_063900.jpg]35.2k0](https://www.ehrenbrav.com/wp-content/flagallery/mt-st-helens-take-3/img_20140511_063900.jpg)
![[img src=https://www.ehrenbrav.com/wp-content/flagallery/mt-st-helens-take-3/thumbs/thumbs_mjw_6852.jpg]35.1k0](https://www.ehrenbrav.com/wp-content/flagallery/mt-st-helens-take-3/mjw_6852.jpg)
![[img src=https://www.ehrenbrav.com/wp-content/flagallery/mt-st-helens-take-3/thumbs/thumbs_img_20140511_094200.jpg]35.1k0](https://www.ehrenbrav.com/wp-content/flagallery/mt-st-helens-take-3/img_20140511_094200.jpg)
![[img src=https://www.ehrenbrav.com/wp-content/flagallery/mt-st-helens-take-3/thumbs/thumbs_img_20140511_094534.jpg]35.1k0](https://www.ehrenbrav.com/wp-content/flagallery/mt-st-helens-take-3/img_20140511_094534.jpg)
![[img src=https://www.ehrenbrav.com/wp-content/flagallery/mt-st-helens-take-3/thumbs/thumbs_mjw_6886.jpg]35k0](https://www.ehrenbrav.com/wp-content/flagallery/mt-st-helens-take-3/mjw_6886.jpg)
![[img src=https://www.ehrenbrav.com/wp-content/flagallery/mt-st-helens-take-3/thumbs/thumbs_mjw_6894.jpg]35k0](https://www.ehrenbrav.com/wp-content/flagallery/mt-st-helens-take-3/mjw_6894.jpg)
![[img src=https://www.ehrenbrav.com/wp-content/flagallery/sloan-peak/thumbs/thumbs_620443_623542488736_560360326_o.jpg]21440](https://www.ehrenbrav.com/wp-content/flagallery/sloan-peak/620443_623542488736_560360326_o.jpg)
![[img src=https://www.ehrenbrav.com/wp-content/flagallery/sloan-peak/thumbs/thumbs_464814_623542518676_1187374841_o.jpg]20530](https://www.ehrenbrav.com/wp-content/flagallery/sloan-peak/464814_623542518676_1187374841_o.jpg)
![[img src=https://www.ehrenbrav.com/wp-content/flagallery/sloan-peak/thumbs/thumbs_621892_623542543626_1217497701_o.jpg]20000](https://www.ehrenbrav.com/wp-content/flagallery/sloan-peak/621892_623542543626_1217497701_o.jpg)
![[img src=https://www.ehrenbrav.com/wp-content/flagallery/sloan-peak/thumbs/thumbs_210756_623542598516_1185277586_o.jpg]19660](https://www.ehrenbrav.com/wp-content/flagallery/sloan-peak/210756_623542598516_1185277586_o.jpg)
![[img src=https://www.ehrenbrav.com/wp-content/flagallery/sloan-peak/thumbs/thumbs_616947_623542618476_1659966178_o.jpg]19240](https://www.ehrenbrav.com/wp-content/flagallery/sloan-peak/616947_623542618476_1659966178_o.jpg)
![[img src=https://www.ehrenbrav.com/wp-content/flagallery/sloan-peak/thumbs/thumbs_192274_623542643426_1132692401_o.jpg]18910](https://www.ehrenbrav.com/wp-content/flagallery/sloan-peak/192274_623542643426_1132692401_o.jpg)
![[img src=https://www.ehrenbrav.com/wp-content/flagallery/sloan-peak/thumbs/thumbs_622387_623542663386_1262042607_o.jpg]18710](https://www.ehrenbrav.com/wp-content/flagallery/sloan-peak/622387_623542663386_1262042607_o.jpg)
![[img src=https://www.ehrenbrav.com/wp-content/flagallery/sloan-peak/thumbs/thumbs_614647_623542683346_548558124_o.jpg]18600](https://www.ehrenbrav.com/wp-content/flagallery/sloan-peak/614647_623542683346_548558124_o.jpg)
![[img src=https://www.ehrenbrav.com/wp-content/flagallery/sloan-peak/thumbs/thumbs_202696_623542698316_1658348956_o.jpg]18440](https://www.ehrenbrav.com/wp-content/flagallery/sloan-peak/202696_623542698316_1658348956_o.jpg)
![[img src=https://www.ehrenbrav.com/wp-content/flagallery/sloan-peak/thumbs/thumbs_326643_623542763186_1072990588_o.jpg]18340](https://www.ehrenbrav.com/wp-content/flagallery/sloan-peak/326643_623542763186_1072990588_o.jpg)
![[img src=https://www.ehrenbrav.com/wp-content/flagallery/sloan-peak/thumbs/thumbs_622497_623542773166_158672657_o.jpg]18150](https://www.ehrenbrav.com/wp-content/flagallery/sloan-peak/622497_623542773166_158672657_o.jpg)
![[img src=https://www.ehrenbrav.com/wp-content/flagallery/sloan-peak/thumbs/thumbs_202519_623542823066_1672447045_o.jpg]18160](https://www.ehrenbrav.com/wp-content/flagallery/sloan-peak/202519_623542823066_1672447045_o.jpg)
![[img src=https://www.ehrenbrav.com/wp-content/flagallery/sloan-peak/thumbs/thumbs_578758_623542848016_1579607775_n.jpg]18120](https://www.ehrenbrav.com/wp-content/flagallery/sloan-peak/578758_623542848016_1579607775_n.jpg)
![[img src=https://www.ehrenbrav.com/wp-content/flagallery/sloan-peak/thumbs/thumbs_327884_623542867976_783405149_o.jpg]17980](https://www.ehrenbrav.com/wp-content/flagallery/sloan-peak/327884_623542867976_783405149_o.jpg)
![[img src=https://www.ehrenbrav.com/wp-content/flagallery/sloan-peak/thumbs/thumbs_191894_623542942826_1469971361_o.jpg]17870](https://www.ehrenbrav.com/wp-content/flagallery/sloan-peak/191894_623542942826_1469971361_o.jpg)
![[img src=https://www.ehrenbrav.com/wp-content/flagallery/sloan-peak/thumbs/thumbs_340362_623542957796_265024474_o.jpg]17800](https://www.ehrenbrav.com/wp-content/flagallery/sloan-peak/340362_623542957796_265024474_o.jpg)
![[img src=https://www.ehrenbrav.com/wp-content/flagallery/sloan-peak/thumbs/thumbs_337792_623542987736_414096256_o.jpg]17740](https://www.ehrenbrav.com/wp-content/flagallery/sloan-peak/337792_623542987736_414096256_o.jpg)
![[img src=https://www.ehrenbrav.com/wp-content/flagallery/sloan-peak/thumbs/thumbs_280962_623543002706_1977625124_o.jpg]17640](https://www.ehrenbrav.com/wp-content/flagallery/sloan-peak/280962_623543002706_1977625124_o.jpg)
![[img src=https://www.ehrenbrav.com/wp-content/flagallery/sloan-peak/thumbs/thumbs_329649_623543047616_1548142791_o.jpg]17550](https://www.ehrenbrav.com/wp-content/flagallery/sloan-peak/329649_623543047616_1548142791_o.jpg)
![[img src=https://www.ehrenbrav.com/wp-content/flagallery/sloan-peak/thumbs/thumbs_456519_623543072566_444996622_o.jpg]17570](https://www.ehrenbrav.com/wp-content/flagallery/sloan-peak/456519_623543072566_444996622_o.jpg)
![[img src=https://www.ehrenbrav.com/wp-content/flagallery/sloan-peak/thumbs/thumbs_169555_623543097516_84593080_o.jpg]17510](https://www.ehrenbrav.com/wp-content/flagallery/sloan-peak/169555_623543097516_84593080_o.jpg)
![[img src=https://www.ehrenbrav.com/wp-content/flagallery/sloan-peak/thumbs/thumbs_620488_623543112486_1556426092_o.jpg]17450](https://www.ehrenbrav.com/wp-content/flagallery/sloan-peak/620488_623543112486_1556426092_o.jpg)
![[img src=https://www.ehrenbrav.com/wp-content/flagallery/sloan-peak/thumbs/thumbs_333969_623543132446_889698848_o.jpg]17380](https://www.ehrenbrav.com/wp-content/flagallery/sloan-peak/333969_623543132446_889698848_o.jpg)
![[img src=https://www.ehrenbrav.com/wp-content/flagallery/sloan-peak/thumbs/thumbs_614572_623543142426_140076932_o.jpg]17340](https://www.ehrenbrav.com/wp-content/flagallery/sloan-peak/614572_623543142426_140076932_o.jpg)
![[img src=https://www.ehrenbrav.com/wp-content/flagallery/sloan-peak/thumbs/thumbs_210763_623543162386_358897274_o.jpg]17280](https://www.ehrenbrav.com/wp-content/flagallery/sloan-peak/210763_623543162386_358897274_o.jpg)
![[img src=https://www.ehrenbrav.com/wp-content/flagallery/sloan-peak/thumbs/thumbs_614651_623543192326_2106139238_o.jpg]17230](https://www.ehrenbrav.com/wp-content/flagallery/sloan-peak/614651_623543192326_2106139238_o.jpg)
![[img src=https://www.ehrenbrav.com/wp-content/flagallery/sloan-peak/thumbs/thumbs_621595_623543207296_226565887_o.jpg]17100](https://www.ehrenbrav.com/wp-content/flagallery/sloan-peak/621595_623543207296_226565887_o.jpg)
![[img src=https://www.ehrenbrav.com/wp-content/flagallery/sloan-peak/thumbs/thumbs_621075_623543227256_1397750922_o.jpg]17060](https://www.ehrenbrav.com/wp-content/flagallery/sloan-peak/621075_623543227256_1397750922_o.jpg)
![[img src=https://www.ehrenbrav.com/wp-content/flagallery/sloan-peak/thumbs/thumbs_621887_623543302106_2133034337_o.jpg]16970](https://www.ehrenbrav.com/wp-content/flagallery/sloan-peak/621887_623543302106_2133034337_o.jpg)
![[img src=https://www.ehrenbrav.com/wp-content/flagallery/sloan-peak/thumbs/thumbs_278401_623543327056_815044843_o.jpg]16920](https://www.ehrenbrav.com/wp-content/flagallery/sloan-peak/278401_623543327056_815044843_o.jpg)
![[img src=https://www.ehrenbrav.com/wp-content/flagallery/sloan-peak/thumbs/thumbs_322069_623543342026_863997096_o.jpg]16910](https://www.ehrenbrav.com/wp-content/flagallery/sloan-peak/322069_623543342026_863997096_o.jpg)
![[img src=https://www.ehrenbrav.com/wp-content/flagallery/sloan-peak/thumbs/thumbs_326544_623543361986_882227959_o.jpg]16830](https://www.ehrenbrav.com/wp-content/flagallery/sloan-peak/326544_623543361986_882227959_o.jpg)
![[img src=https://www.ehrenbrav.com/wp-content/flagallery/sloan-peak/thumbs/thumbs_411513_623543376956_1111694820_o.jpg]16770](https://www.ehrenbrav.com/wp-content/flagallery/sloan-peak/411513_623543376956_1111694820_o.jpg)
![[img src=https://www.ehrenbrav.com/wp-content/flagallery/sloan-peak/thumbs/thumbs_616805_623543416876_1006413360_o.jpg]16740](https://www.ehrenbrav.com/wp-content/flagallery/sloan-peak/616805_623543416876_1006413360_o.jpg)
![[img src=https://www.ehrenbrav.com/wp-content/flagallery/sloan-peak/thumbs/thumbs_522040_623543431846_1450116473_n.jpg]16750](https://www.ehrenbrav.com/wp-content/flagallery/sloan-peak/522040_623543431846_1450116473_n.jpg)
![[img src=https://www.ehrenbrav.com/wp-content/flagallery/sloan-peak/thumbs/thumbs_337778_623543451806_2034712814_o.jpg]16640](https://www.ehrenbrav.com/wp-content/flagallery/sloan-peak/337778_623543451806_2034712814_o.jpg)
![[img src=https://www.ehrenbrav.com/wp-content/flagallery/sloan-peak/thumbs/thumbs_627327_623543501706_1190097480_o.jpg]16610](https://www.ehrenbrav.com/wp-content/flagallery/sloan-peak/627327_623543501706_1190097480_o.jpg)
![[img src=https://www.ehrenbrav.com/wp-content/flagallery/sloan-peak/thumbs/thumbs_278467_623543561586_392151091_o.jpg]16540](https://www.ehrenbrav.com/wp-content/flagallery/sloan-peak/278467_623543561586_392151091_o.jpg)
![[img src=https://www.ehrenbrav.com/wp-content/flagallery/sloan-peak/thumbs/thumbs_556502_623543641426_1963963174_n.jpg]16560](https://www.ehrenbrav.com/wp-content/flagallery/sloan-peak/556502_623543641426_1963963174_n.jpg)
![[img src=https://www.ehrenbrav.com/wp-content/flagallery/sloan-peak/thumbs/thumbs_621788_623543711286_1354612674_o.jpg]16540](https://www.ehrenbrav.com/wp-content/flagallery/sloan-peak/621788_623543711286_1354612674_o.jpg)
![[img src=https://www.ehrenbrav.com/wp-content/flagallery/upper-royal-lake-basin/thumbs/thumbs_img_2407.jpg]22610](https://www.ehrenbrav.com/wp-content/flagallery/upper-royal-lake-basin/img_2407.jpg)
![[img src=https://www.ehrenbrav.com/wp-content/flagallery/upper-royal-lake-basin/thumbs/thumbs_img_2414.jpg]21860](https://www.ehrenbrav.com/wp-content/flagallery/upper-royal-lake-basin/img_2414.jpg)
![[img src=https://www.ehrenbrav.com/wp-content/flagallery/upper-royal-lake-basin/thumbs/thumbs_img_2418.jpg]21440](https://www.ehrenbrav.com/wp-content/flagallery/upper-royal-lake-basin/img_2418.jpg)
![[img src=https://www.ehrenbrav.com/wp-content/flagallery/upper-royal-lake-basin/thumbs/thumbs_img_2419.jpg]21090](https://www.ehrenbrav.com/wp-content/flagallery/upper-royal-lake-basin/img_2419.jpg)
![[img src=https://www.ehrenbrav.com/wp-content/flagallery/upper-royal-lake-basin/thumbs/thumbs_img_2423.jpg]20760](https://www.ehrenbrav.com/wp-content/flagallery/upper-royal-lake-basin/img_2423.jpg)
![[img src=https://www.ehrenbrav.com/wp-content/flagallery/upper-royal-lake-basin/thumbs/thumbs_img_2426.jpg]20430](https://www.ehrenbrav.com/wp-content/flagallery/upper-royal-lake-basin/img_2426.jpg)
![[img src=https://www.ehrenbrav.com/wp-content/flagallery/upper-royal-lake-basin/thumbs/thumbs_img_2431.jpg]20270](https://www.ehrenbrav.com/wp-content/flagallery/upper-royal-lake-basin/img_2431.jpg)
![[img src=https://www.ehrenbrav.com/wp-content/flagallery/upper-royal-lake-basin/thumbs/thumbs_img_2432.jpg]20100](https://www.ehrenbrav.com/wp-content/flagallery/upper-royal-lake-basin/img_2432.jpg)
![[img src=https://www.ehrenbrav.com/wp-content/flagallery/upper-royal-lake-basin/thumbs/thumbs_img_2433.jpg]19980](https://www.ehrenbrav.com/wp-content/flagallery/upper-royal-lake-basin/img_2433.jpg)
![[img src=https://www.ehrenbrav.com/wp-content/flagallery/upper-royal-lake-basin/thumbs/thumbs_img_2435.jpg]19830](https://www.ehrenbrav.com/wp-content/flagallery/upper-royal-lake-basin/img_2435.jpg)
![[img src=https://www.ehrenbrav.com/wp-content/flagallery/upper-royal-lake-basin/thumbs/thumbs_img_2437.jpg]19800](https://www.ehrenbrav.com/wp-content/flagallery/upper-royal-lake-basin/img_2437.jpg)
![[img src=https://www.ehrenbrav.com/wp-content/flagallery/upper-royal-lake-basin/thumbs/thumbs_img_2439.jpg]19700](https://www.ehrenbrav.com/wp-content/flagallery/upper-royal-lake-basin/img_2439.jpg)
![[img src=https://www.ehrenbrav.com/wp-content/flagallery/upper-royal-lake-basin/thumbs/thumbs_img_2440.jpg]19640](https://www.ehrenbrav.com/wp-content/flagallery/upper-royal-lake-basin/img_2440.jpg)
![[img src=https://www.ehrenbrav.com/wp-content/flagallery/upper-royal-lake-basin/thumbs/thumbs_img_2443.jpg]19490](https://www.ehrenbrav.com/wp-content/flagallery/upper-royal-lake-basin/img_2443.jpg)
![[img src=https://www.ehrenbrav.com/wp-content/flagallery/upper-royal-lake-basin/thumbs/thumbs_img_2445.jpg]19390](https://www.ehrenbrav.com/wp-content/flagallery/upper-royal-lake-basin/img_2445.jpg)
![[img src=https://www.ehrenbrav.com/wp-content/flagallery/upper-royal-lake-basin/thumbs/thumbs_img_2448.jpg]19270](https://www.ehrenbrav.com/wp-content/flagallery/upper-royal-lake-basin/img_2448.jpg)
![[img src=https://www.ehrenbrav.com/wp-content/flagallery/upper-royal-lake-basin/thumbs/thumbs_img_2452.jpg]19170](https://www.ehrenbrav.com/wp-content/flagallery/upper-royal-lake-basin/img_2452.jpg)
![[img src=https://www.ehrenbrav.com/wp-content/flagallery/upper-royal-lake-basin/thumbs/thumbs_img_2454.jpg]19130](https://www.ehrenbrav.com/wp-content/flagallery/upper-royal-lake-basin/img_2454.jpg)
![[img src=https://www.ehrenbrav.com/wp-content/flagallery/upper-royal-lake-basin/thumbs/thumbs_img_2458.jpg]18960](https://www.ehrenbrav.com/wp-content/flagallery/upper-royal-lake-basin/img_2458.jpg)
![[img src=https://www.ehrenbrav.com/wp-content/flagallery/upper-royal-lake-basin/thumbs/thumbs_img_2466.jpg]18940](https://www.ehrenbrav.com/wp-content/flagallery/upper-royal-lake-basin/img_2466.jpg)
![[img src=https://www.ehrenbrav.com/wp-content/flagallery/upper-royal-lake-basin/thumbs/thumbs_img_2470.jpg]18810](https://www.ehrenbrav.com/wp-content/flagallery/upper-royal-lake-basin/img_2470.jpg)
![[img src=https://www.ehrenbrav.com/wp-content/flagallery/upper-royal-lake-basin/thumbs/thumbs_img_2471.jpg]18680](https://www.ehrenbrav.com/wp-content/flagallery/upper-royal-lake-basin/img_2471.jpg)
![[img src=https://www.ehrenbrav.com/wp-content/flagallery/upper-royal-lake-basin/thumbs/thumbs_img_2475.jpg]18610](https://www.ehrenbrav.com/wp-content/flagallery/upper-royal-lake-basin/img_2475.jpg)
![[img src=https://www.ehrenbrav.com/wp-content/flagallery/upper-royal-lake-basin/thumbs/thumbs_img_2479.jpg]18560](https://www.ehrenbrav.com/wp-content/flagallery/upper-royal-lake-basin/img_2479.jpg)
![[img src=https://www.ehrenbrav.com/wp-content/flagallery/upper-royal-lake-basin/thumbs/thumbs_img_2481.jpg]18510](https://www.ehrenbrav.com/wp-content/flagallery/upper-royal-lake-basin/img_2481.jpg)
![[img src=https://www.ehrenbrav.com/wp-content/flagallery/upper-royal-lake-basin/thumbs/thumbs_img_2488.jpg]18600](https://www.ehrenbrav.com/wp-content/flagallery/upper-royal-lake-basin/img_2488.jpg)
![[img src=https://www.ehrenbrav.com/wp-content/flagallery/upper-royal-lake-basin/thumbs/thumbs_img_2490.jpg]18490](https://www.ehrenbrav.com/wp-content/flagallery/upper-royal-lake-basin/img_2490.jpg)
![[img src=https://www.ehrenbrav.com/wp-content/flagallery/upper-royal-lake-basin/thumbs/thumbs_img_2495.jpg]18350](https://www.ehrenbrav.com/wp-content/flagallery/upper-royal-lake-basin/img_2495.jpg)
![[img src=https://www.ehrenbrav.com/wp-content/flagallery/upper-royal-lake-basin/thumbs/thumbs_img_2496.jpg]18290](https://www.ehrenbrav.com/wp-content/flagallery/upper-royal-lake-basin/img_2496.jpg)
![[img src=https://www.ehrenbrav.com/wp-content/flagallery/upper-royal-lake-basin/thumbs/thumbs_img_2501.jpg]18380](https://www.ehrenbrav.com/wp-content/flagallery/upper-royal-lake-basin/img_2501.jpg)
![[img src=https://www.ehrenbrav.com/wp-content/flagallery/upper-royal-lake-basin/thumbs/thumbs_img_2502.jpg]18250](https://www.ehrenbrav.com/wp-content/flagallery/upper-royal-lake-basin/img_2502.jpg)
![[img src=https://www.ehrenbrav.com/wp-content/flagallery/upper-royal-lake-basin/thumbs/thumbs_img_2503.jpg]18260](https://www.ehrenbrav.com/wp-content/flagallery/upper-royal-lake-basin/img_2503.jpg)
![[img src=https://www.ehrenbrav.com/wp-content/flagallery/mt-baker-ice-i-field-trip/thumbs/thumbs_img_9720.jpg]21760](https://www.ehrenbrav.com/wp-content/flagallery/mt-baker-ice-i-field-trip/img_9720.jpg)
![[img src=https://www.ehrenbrav.com/wp-content/flagallery/mt-baker-ice-i-field-trip/thumbs/thumbs_img_9724.jpg]20960](https://www.ehrenbrav.com/wp-content/flagallery/mt-baker-ice-i-field-trip/img_9724.jpg)
![[img src=https://www.ehrenbrav.com/wp-content/flagallery/mt-baker-ice-i-field-trip/thumbs/thumbs_img_9730.jpg]20540](https://www.ehrenbrav.com/wp-content/flagallery/mt-baker-ice-i-field-trip/img_9730.jpg)
![[img src=https://www.ehrenbrav.com/wp-content/flagallery/mt-baker-ice-i-field-trip/thumbs/thumbs_img_9737.jpg]20200](https://www.ehrenbrav.com/wp-content/flagallery/mt-baker-ice-i-field-trip/img_9737.jpg)
![[img src=https://www.ehrenbrav.com/wp-content/flagallery/mt-baker-ice-i-field-trip/thumbs/thumbs_img_9754.jpg]19890](https://www.ehrenbrav.com/wp-content/flagallery/mt-baker-ice-i-field-trip/img_9754.jpg)
![[img src=https://www.ehrenbrav.com/wp-content/flagallery/mt-baker-ice-i-field-trip/thumbs/thumbs_img_9758.jpg]19580](https://www.ehrenbrav.com/wp-content/flagallery/mt-baker-ice-i-field-trip/img_9758.jpg)
![[img src=https://www.ehrenbrav.com/wp-content/flagallery/mt-baker-ice-i-field-trip/thumbs/thumbs_img_9762.jpg]19420](https://www.ehrenbrav.com/wp-content/flagallery/mt-baker-ice-i-field-trip/img_9762.jpg)
![[img src=https://www.ehrenbrav.com/wp-content/flagallery/mt-baker-ice-i-field-trip/thumbs/thumbs_img_9763.jpg]19240](https://www.ehrenbrav.com/wp-content/flagallery/mt-baker-ice-i-field-trip/img_9763.jpg)
![[img src=https://www.ehrenbrav.com/wp-content/flagallery/mt-baker-ice-i-field-trip/thumbs/thumbs_img_9766.jpg]19060](https://www.ehrenbrav.com/wp-content/flagallery/mt-baker-ice-i-field-trip/img_9766.jpg)
![[img src=https://www.ehrenbrav.com/wp-content/flagallery/mt-baker-ice-i-field-trip/thumbs/thumbs_img_9779.jpg]18960](https://www.ehrenbrav.com/wp-content/flagallery/mt-baker-ice-i-field-trip/img_9779.jpg)
![[img src=https://www.ehrenbrav.com/wp-content/flagallery/mt-baker-ice-i-field-trip/thumbs/thumbs_img_9796.jpg]18750](https://www.ehrenbrav.com/wp-content/flagallery/mt-baker-ice-i-field-trip/img_9796.jpg)
![[img src=https://www.ehrenbrav.com/wp-content/flagallery/mt-baker-ice-i-field-trip/thumbs/thumbs_img_9797.jpg]18670](https://www.ehrenbrav.com/wp-content/flagallery/mt-baker-ice-i-field-trip/img_9797.jpg)
![[img src=https://www.ehrenbrav.com/wp-content/flagallery/mt-baker-ice-i-field-trip/thumbs/thumbs_img_9799.jpg]18520](https://www.ehrenbrav.com/wp-content/flagallery/mt-baker-ice-i-field-trip/img_9799.jpg)
![[img src=https://www.ehrenbrav.com/wp-content/flagallery/mt-baker-ice-i-field-trip/thumbs/thumbs_img_9800.jpg]18450](https://www.ehrenbrav.com/wp-content/flagallery/mt-baker-ice-i-field-trip/img_9800.jpg)
![[img src=https://www.ehrenbrav.com/wp-content/flagallery/mt-baker-ice-i-field-trip/thumbs/thumbs_img_9801.jpg]18340](https://www.ehrenbrav.com/wp-content/flagallery/mt-baker-ice-i-field-trip/img_9801.jpg)
![[img src=https://www.ehrenbrav.com/wp-content/flagallery/mt-baker-ice-i-field-trip/thumbs/thumbs_img_9808.jpg]18220](https://www.ehrenbrav.com/wp-content/flagallery/mt-baker-ice-i-field-trip/img_9808.jpg)
![[img src=https://www.ehrenbrav.com/wp-content/flagallery/mt-baker-ice-i-field-trip/thumbs/thumbs_img_9810.jpg]18180](https://www.ehrenbrav.com/wp-content/flagallery/mt-baker-ice-i-field-trip/img_9810.jpg)
![[img src=https://www.ehrenbrav.com/wp-content/flagallery/mt-baker-ice-i-field-trip/thumbs/thumbs_img_9833.jpg]18020](https://www.ehrenbrav.com/wp-content/flagallery/mt-baker-ice-i-field-trip/img_9833.jpg)
![[img src=https://www.ehrenbrav.com/wp-content/flagallery/mt-baker-ice-i-field-trip/thumbs/thumbs_img_9838.jpg]18010](https://www.ehrenbrav.com/wp-content/flagallery/mt-baker-ice-i-field-trip/img_9838.jpg)
![[img src=https://www.ehrenbrav.com/wp-content/flagallery/colchuck-peak/thumbs/thumbs_mjw_0016-w-tm_0.jpg]17970](https://www.ehrenbrav.com/wp-content/flagallery/colchuck-peak/mjw_0016-w-tm_0.jpg)
![[img src=https://www.ehrenbrav.com/wp-content/flagallery/colchuck-peak/thumbs/thumbs_mjw_0018-w-tm.jpg]17380](https://www.ehrenbrav.com/wp-content/flagallery/colchuck-peak/mjw_0018-w-tm.jpg)
![[img src=https://www.ehrenbrav.com/wp-content/flagallery/colchuck-peak/thumbs/thumbs_mjw_0029-w-tm.jpg]17000](https://www.ehrenbrav.com/wp-content/flagallery/colchuck-peak/mjw_0029-w-tm.jpg)
![[img src=https://www.ehrenbrav.com/wp-content/flagallery/colchuck-peak/thumbs/thumbs_mjw_0031-w-tm.jpg]16670](https://www.ehrenbrav.com/wp-content/flagallery/colchuck-peak/mjw_0031-w-tm.jpg)
![[img src=https://www.ehrenbrav.com/wp-content/flagallery/colchuck-peak/thumbs/thumbs_mjw_0047-w-tm.jpg]16390](https://www.ehrenbrav.com/wp-content/flagallery/colchuck-peak/mjw_0047-w-tm.jpg)
![[img src=https://www.ehrenbrav.com/wp-content/flagallery/colchuck-peak/thumbs/thumbs_mjw_0053-w-tm.jpg]16190](https://www.ehrenbrav.com/wp-content/flagallery/colchuck-peak/mjw_0053-w-tm.jpg)
![[img src=https://www.ehrenbrav.com/wp-content/flagallery/colchuck-peak/thumbs/thumbs_mjw_0082-w-tm.jpg]16040](https://www.ehrenbrav.com/wp-content/flagallery/colchuck-peak/mjw_0082-w-tm.jpg)
![[img src=https://www.ehrenbrav.com/wp-content/flagallery/colchuck-peak/thumbs/thumbs_mjw_0091-w-tm.jpg]15960](https://www.ehrenbrav.com/wp-content/flagallery/colchuck-peak/mjw_0091-w-tm.jpg)
![[img src=https://www.ehrenbrav.com/wp-content/flagallery/colchuck-peak/thumbs/thumbs_mjw_0092-w-tm.jpg]15860](https://www.ehrenbrav.com/wp-content/flagallery/colchuck-peak/mjw_0092-w-tm.jpg)
![[img src=https://www.ehrenbrav.com/wp-content/flagallery/colchuck-peak/thumbs/thumbs_mjw_0103-w-tm.jpg]15720](https://www.ehrenbrav.com/wp-content/flagallery/colchuck-peak/mjw_0103-w-tm.jpg)
![[img src=https://www.ehrenbrav.com/wp-content/flagallery/colchuck-peak/thumbs/thumbs_mjw_0108-w-tm.jpg]15640](https://www.ehrenbrav.com/wp-content/flagallery/colchuck-peak/mjw_0108-w-tm.jpg)
![[img src=https://www.ehrenbrav.com/wp-content/flagallery/colchuck-peak/thumbs/thumbs_mjw_0110-w-tm.jpg]15540](https://www.ehrenbrav.com/wp-content/flagallery/colchuck-peak/mjw_0110-w-tm.jpg)
![[img src=https://www.ehrenbrav.com/wp-content/flagallery/colchuck-peak/thumbs/thumbs_mjw_0143-w-tm.jpg]15400](https://www.ehrenbrav.com/wp-content/flagallery/colchuck-peak/mjw_0143-w-tm.jpg)
![[img src=https://www.ehrenbrav.com/wp-content/flagallery/colchuck-peak/thumbs/thumbs_mjw_0145-w-tm.jpg]15370](https://www.ehrenbrav.com/wp-content/flagallery/colchuck-peak/mjw_0145-w-tm.jpg)
![[img src=https://www.ehrenbrav.com/wp-content/flagallery/colchuck-peak/thumbs/thumbs_mjw_0149-w-tm.jpg]15330](https://www.ehrenbrav.com/wp-content/flagallery/colchuck-peak/mjw_0149-w-tm.jpg)
![[img src=https://www.ehrenbrav.com/wp-content/flagallery/colchuck-peak/thumbs/thumbs_mjw_0176-w-tm.jpg]15280](https://www.ehrenbrav.com/wp-content/flagallery/colchuck-peak/mjw_0176-w-tm.jpg)
![[img src=https://www.ehrenbrav.com/wp-content/flagallery/colchuck-peak/thumbs/thumbs_mjw_0188-w-tm.jpg]15220](https://www.ehrenbrav.com/wp-content/flagallery/colchuck-peak/mjw_0188-w-tm.jpg)
![[img src=https://www.ehrenbrav.com/wp-content/flagallery/colchuck-peak/thumbs/thumbs_mjw_0195-w-tm.jpg]15120](https://www.ehrenbrav.com/wp-content/flagallery/colchuck-peak/mjw_0195-w-tm.jpg)
![[img src=https://www.ehrenbrav.com/wp-content/flagallery/colchuck-peak/thumbs/thumbs_mjw_0217-w-tm.jpg]15080](https://www.ehrenbrav.com/wp-content/flagallery/colchuck-peak/mjw_0217-w-tm.jpg)
![[img src=https://www.ehrenbrav.com/wp-content/flagallery/colchuck-peak/thumbs/thumbs_mjw_0222-w-tm.jpg]15030](https://www.ehrenbrav.com/wp-content/flagallery/colchuck-peak/mjw_0222-w-tm.jpg)
![[img src=https://www.ehrenbrav.com/wp-content/flagallery/colchuck-peak/thumbs/thumbs_mjw_0233-w-tm.jpg]14900](https://www.ehrenbrav.com/wp-content/flagallery/colchuck-peak/mjw_0233-w-tm.jpg)
![[img src=https://www.ehrenbrav.com/wp-content/flagallery/colchuck-peak/thumbs/thumbs_mjw_0239-w-tm.jpg]14800](https://www.ehrenbrav.com/wp-content/flagallery/colchuck-peak/mjw_0239-w-tm.jpg)
![[img src=https://www.ehrenbrav.com/wp-content/flagallery/colchuck-peak/thumbs/thumbs_mjw_0263-w-tm.jpg]14700](https://www.ehrenbrav.com/wp-content/flagallery/colchuck-peak/mjw_0263-w-tm.jpg)
![[img src=https://www.ehrenbrav.com/wp-content/flagallery/colchuck-peak/thumbs/thumbs_mjw_0271-w-tm.jpg]14600](https://www.ehrenbrav.com/wp-content/flagallery/colchuck-peak/mjw_0271-w-tm.jpg)
![[img src=https://www.ehrenbrav.com/wp-content/flagallery/colchuck-peak/thumbs/thumbs_mjw_0279-w-tm.jpg]14580](https://www.ehrenbrav.com/wp-content/flagallery/colchuck-peak/mjw_0279-w-tm.jpg)
![[img src=https://www.ehrenbrav.com/wp-content/flagallery/mt-constitution-trip/thumbs/thumbs_p1060693.jpg]45900](https://www.ehrenbrav.com/wp-content/flagallery/mt-constitution-trip/p1060693.jpg)
![[img src=https://www.ehrenbrav.com/wp-content/flagallery/mt-constitution-trip/thumbs/thumbs_p1060700.jpg]45250](https://www.ehrenbrav.com/wp-content/flagallery/mt-constitution-trip/p1060700.jpg)
![[img src=https://www.ehrenbrav.com/wp-content/flagallery/mt-constitution-trip/thumbs/thumbs_p1060702.jpg]44890](https://www.ehrenbrav.com/wp-content/flagallery/mt-constitution-trip/p1060702.jpg)
![[img src=https://www.ehrenbrav.com/wp-content/flagallery/mt-constitution-trip/thumbs/thumbs_constitutionvista.jpg]44550](https://www.ehrenbrav.com/wp-content/flagallery/mt-constitution-trip/constitutionvista.jpg)
![[img src=https://www.ehrenbrav.com/wp-content/flagallery/mt-constitution-trip/thumbs/thumbs_mtconstitutionlookout.jpg]44190](https://www.ehrenbrav.com/wp-content/flagallery/mt-constitution-trip/mtconstitutionlookout.jpg)
![[img src=https://www.ehrenbrav.com/wp-content/flagallery/mt-constitution-trip/thumbs/thumbs_mtconstitutionbelowfalsesummit.jpg]43940](https://www.ehrenbrav.com/wp-content/flagallery/mt-constitution-trip/mtconstitutionbelowfalsesummit.jpg)
![[img src=https://www.ehrenbrav.com/wp-content/flagallery/mt-constitution-trip/thumbs/thumbs_p1060730_stitch.jpg]43780](https://www.ehrenbrav.com/wp-content/flagallery/mt-constitution-trip/p1060730_stitch.jpg)
![[img src=https://www.ehrenbrav.com/wp-content/flagallery/mt-constitution-trip/thumbs/thumbs_mtconstitutionferrysunset.jpg]43610](https://www.ehrenbrav.com/wp-content/flagallery/mt-constitution-trip/mtconstitutionferrysunset.jpg)
![[img src=https://www.ehrenbrav.com/wp-content/flagallery/mt-constitution-trip/thumbs/thumbs_p1060735.jpg]43500](https://www.ehrenbrav.com/wp-content/flagallery/mt-constitution-trip/p1060735.jpg)
![[img src=https://www.ehrenbrav.com/wp-content/flagallery/mt-constitution-trip/thumbs/thumbs_constitutionmap.jpg]43320](https://www.ehrenbrav.com/wp-content/flagallery/mt-constitution-trip/constitutionmap.jpg)
![[img src=https://www.ehrenbrav.com/wp-content/flagallery/mt-constitution-trip/thumbs/thumbs_img_3440.jpg]43270](https://www.ehrenbrav.com/wp-content/flagallery/mt-constitution-trip/img_3440.jpg)
![[img src=https://www.ehrenbrav.com/wp-content/flagallery/mt-constitution-trip/thumbs/thumbs_img_3443.jpg]43080](https://www.ehrenbrav.com/wp-content/flagallery/mt-constitution-trip/img_3443.jpg)
![[img src=https://www.ehrenbrav.com/wp-content/flagallery/mt-constitution-trip/thumbs/thumbs_img_3465.jpg]42990](https://www.ehrenbrav.com/wp-content/flagallery/mt-constitution-trip/img_3465.jpg)
![[img src=https://www.ehrenbrav.com/wp-content/flagallery/mt-constitution-trip/thumbs/thumbs_img_3471.jpg]42860](https://www.ehrenbrav.com/wp-content/flagallery/mt-constitution-trip/img_3471.jpg)
![[img src=https://www.ehrenbrav.com/wp-content/flagallery/mt-constitution-trip/thumbs/thumbs_routedetail.jpg]42750](https://www.ehrenbrav.com/wp-content/flagallery/mt-constitution-trip/routedetail.jpg)
![[img src=https://www.ehrenbrav.com/wp-content/flagallery/mt-constitution-trip/thumbs/thumbs_themotherofallanthills.jpg]42620](https://www.ehrenbrav.com/wp-content/flagallery/mt-constitution-trip/themotherofallanthills.jpg)