Author Archives: ehrenbrav - Page 2

Mt. St. Helens Take 3

Mt. St. Helens Crater

Mt. St. Helens Crater – Photo by Mike Warren*


Mountaineering just isn’t the type of sport you expect to have much mass appeal. Maybe it’s the whole masochistic thing – the discomfort, or the cold, wet, fatigue, blisters, heights, early morning starts, etc. Nevertheless, hoards of climbers turn up each Mothers’ Day to ascend Mt. St. Helens, making this the big public event of the mountaineering season.

MtStHelensIt’s tradition to wear dresses on this particular day. I have now idea why, but that’s what many people do, sometimes complete with sun hats with flowers in them, all put on over high performance climbing gear.

This was my third time to Mt. St. Helens and the second time we were successful in summiting (or “cratering” as the case may be). The mountain is not really technical, though having crampons and ice axes is a good idea. It’s a fun, straightforward trip – I’ve heard much better in the snow than during the height of summer.

We usually make a base camp about 3 miles in, but one can easily do the entire climb in a day. There was remarkably little snow this year, which reinforced my decision to go on foot rather than on skis. In my experience, skis work on a narrower set of conditions than snowshoes. Although skis are great for the way down, I still think snowshoes are the most efficient way of getting from Point A to Point B if you’re not sure what the conditions will be.

Mt. St. Helens SummitNevertheless, for the second year in a row, we carried our snowshoes to base camp, left them for the climb, and carried them out again to the trailhead. Taking snowshoes often seems to ensure you won’t encounter snow-shoeable snow.

One of the perks of the mountain are the views from the top. It gives you the feeling of being on of one of the big volcanoes without as much hardship as the others. Standing there makes you feel like you can look down to the entire state of Washington. You literally look down to the clouds, which gives the sensation of being in an airplane, though with both feet on the ground. All this makes for a fun trip without feeling totally blasted afterwards.

* Mike’s extensive gallery of often spectacular mountaineering photography is here.

La Jolla Half Marathon 2014

La Jolla Half Marathon LogoThis is probably one of the prettiest courses I’ve ever run, and also has the benefit of being five minutes from my parent’s house where I grew up. It is also a difficult course, with a decent hill up from the beach to Torrey Pines and then another, smaller hill in La Jolla that hits you right before the end. I had the benefit of having run much of the course many, many times before when I go home to visit the family.

Going up to Torrey Pines is a great training run. You go from the beach up the grade, do a very scenic loop on the Guy Fleming Trail (not part of the half-marathon course), and then continue up past the visitor center to Broken Hills Trail where you can descend again back to the beach (also not part of the actual course). The half-marathon follows much of this route.Race Profile

Being a Lazy Athlete, I didn’t spend much time training, and did a 11 mile run the week before on the Waterfront Trail in Port Angeles (incidentally, the site of the Port Angeles Half-Marathon, which I ran the previous year). Since the weather in Seattle has been wet, I’ve done most of my running indoors on a treadmill. I usually do four 7:30 minute miles, which is convenient to do before I get on the 7:55 AM ferry to Seattle. Sometimes I will do three 7 minute miles instead, but mostly lately it’s been these sort of quick workouts.

14 finishAnyway, my lackadaisical training schedule served me OK for the race, and I didn’t have any problems. I did a sub-two hour race on a tough course, which was my target, so I was happy.

How To Solder Surface-Mount Components

There are tons of soldering tutorials on the web. Everyone seems to have a slightly different set of suggestions – here’s what worked for me. I refined my technique building a homebrew vector network analyzer (check out Scotty’s Spectrum Analyzer if you’re sick of having unstructured free time in your life). This project involves literally hundreds of surface-mount parts, mostly in the 0603 range (ie – tiny but not super-duper tiny).

People sometimes have a hangup about doing SMD soldering. Given that this is how most electronics these days are assembled and even prototyped, it’s just something you need to know. With hot air instead of a soldering iron, I find SMD soldering to be just as easy or even easier than through-hole work. I get my boards printed from ExpressPCB – I’ll do a later post on that process as well.

Equipment

Hot-Air Rework Station

Dual hot air rework and soldering station

I find hot air to be much, much easier to work with than an iron for surface mount parts. It is basically a glorified hair dryer. You can adjust both the temperature and the strength of the flow, and you can use different sized nozzles. I use an iron for soldering through-hole stuff or particularly large components. I like the chisel-shaped iron tips since they deliver a lot of heat and aren’t prone to bending. Whenever you use your iron, wipe it off with a brass sponge afterwards and tin the tip before storing it. This prolongs its life. I really like the Kendal 852D++. It’s pretty much everything you need for soldering – you can adjust the temperature of the hot air and the iron independently, and can tailor the airflow to what you need. It’s about $100 on Amazon.


Solder Paste

Lead Soldering Paste

Yeah, I know lead is toxic and evil. Wash your hands after handling it. For production-level manufacturing, you’ll want to use the lead-free solder. But for prototyping by hand, here’s why lead solder is way better (I’ve used both): it flows at a significantly lower temperature and has very helpful surface-tension characteristics. This makes your work much, much easier. Granted, if you’re doing production-quality or other critical work, you’ll probably need to carefully follow the storage instructions for the paste (which may include keeping it refrigerated and using it within 6 months). But for prototyping, I don’t worry too much about these guidelines. You’ll need a tip and a plunger to use this stuff…it’s essentially a big syringe. 10cc’s of paste will last you a very long time. I use 20 or 22 gauge tips. Buy everything from Zephyrtronics.


PreHeating Hot Plate from Blackjack Solderwerks

Hot air pre-heater

This is not absolutely necessary and I’ve done plenty of soldering without using one. But for certain jobs, it’s very handy. Mine was very reasonably priced around $100 – I have no idea why some of these are listed for like $1000 for essentially a thing that blows hot air in an upward direction. The beauty of the pre-heater is it brings your solder paste to just below the reflow point, so it takes only a little bit of additional hot air from your nozzle to put it over the edge. The other benefit is for large chips with many leads and a small pitch – it allows you to heat them uniformly from underneath. If you’re using just hot air, it’s harder to get all the solder to flow around a big component at the same time, which is what you want because surface tension will pull the thing directly onto the correct pads. With the pre-heater, it is easy to give the chip just a bit of hot air so everything melts simultaneously. I got mine from Circuit Specialists.


Solder Wick

Solder wick

You use this stuff in a couple of situations: (i) when you need to remove extra solder, (ii) when you mess up and need to remove a component, and (iii) when you need to clean excess solder off of pads. Make sure you use plenty of heat with the iron when using solder wick. It can’t be reused, so once you see the wick becoming saturated with silver-colored solder, clip that section off and use fresh wick.  Get it from Sparkfun.  I love these guys! I always try to buy from them if they carry what I need.


Loupe
Stereoscopic Microscope

Jeweler’s Loupe and/or 10x Stereoscopic Microscope

The loupe is a magnifying glass you hold in your eye. I don’t find it particularly comfortable, but it is good for inspecting solder joints quickly. A much better but more time-consuming way is using a stereoscopic microscope. These make it really easy to get up close and personal to all your solder joints. Many hard-to-find bugs can be traced to crappy joints, so it’s well worth your time inspecting. I use the AmScope SE400-Z – it’s about $200 on Amazon and works very well. You can also use it for examining insects and spiders, which is tons of fun in 3D (and will make you glad your not 2 mm tall). I’d recommend a scope that’s made for inspection rather than, say, lab work. You can get the loupe from Sparkfun.


Multimeter

Multimeter

A quality multimeter is a great investment – you can use it for all sorts of electronics work and it’s worth getting a good one. I like the ones that have an audible indicator for a conducting circuit. The premium brand is Fluke, but these are a bit more expensive. I’d bite the bullet and get a Fluke if you’re serious about doing electronics projects – your multimeter is one of the most important tools you’ll have.


Isopropyl Alchohol

Isopropyl Alcohol

Look for 90% concentration or more. Use this to wash off the boards before your work – particularly for important or delicate soldering, and to wash off flux residue once you’re done. I use some Q-Tips and generous amounts of alcohol (for the boards, I mean…). Probably a better way of applying this is with a stiff flux brush, which you can get at a hardware store. Get the alcohol on Amazon or at a drug store.


Flux Pen

Flux pen

I only use flux with through-hole work. Solder paste already has plenty of flux integrated into it. Be sure to get flux intended for electronics and not plumbing.


Clip-on LED Lamp

Clip-on LED Light

This is very useful for getting plenty of light in hard-to-see places.  Get it on Amazon.


Brass Sponge

Brass Wire Soldering Tip Cleaner

This comes in a little container and doesn’t require re-wetting each time you use it (unlike a sponge). Use it whenever you use your iron. OK it’s not actually necessary for hot air work, but I’m mentioning it anyway. Sparkfun carries these.


Safety Goggles

Safety Goggles

Always wear these when soldering. Molten solder can splash and you don’t want it in your eyes. Get goggles that are really comfortable and easy to see through so you don’t think twice about wearing them. Amazon carries these.


Third Hand Clamp

Third Hand or Similar Clamp System

You want the PCB sitting very still when you work on it. With this gadget, I removed the magnifying glass and soldering iron holder. You can always just place your PCB on the table if this works best. Sparkfun has these.


Curved ESD-Safe Tweezers

ESD-Safe Tweezers

I like the curved ones for placing small components. These are in near constant use while prototyping electronics.  Sparkfun has nice ones.


Flush Cutters

Flush Cutters

A good pair of flush cutters is very handy for cutting wire and leads. Hakko makes good ones and Sparkfun carries them.


L/C Meter

Extra Credit: L/C Meter

For situations where the precise value of your caps (or coils) is important, you’ll want to test them before soldering into your circuit. I like the Almost-All Digital Electronics kit. They’ll send you the pieces and you can put it together! Don’t bother measuring your standard bypass caps, where small variations won’t really matter. This test is really for filtering circuits and the like. Since SMD caps are frequently unlabeled, you have no way of knowing for sure what the value of a given cap is without testing it. Occasionally, a cap is *not* the value it’s distributor or manufacturer states!


Procedure

With the right tools and a bit of practice, soldering is easy. The biggest time suck here is correcting mistakes, so remember the Golden Rule:

  • Think thrice
  • Measure twice
  • Cut/weld/solder/bend/saw/glue/paint/print/lase/commence-fissile-reaction once
  1. Set out all the components you’ll be needing

    I usually do batches of the same component at each go, so I’ll solder all the .1uF caps at once, then turn to all my 330 resistors. If you’re dealing with ESD-sensitive components (opamps, most integrated circuits), remember to ground yourself first (get a ESD wrist strap if you’re particularly paranoid). As I’m taking the pieces out of the ESD-safe bag, I try to touch them only with my tweezers.

  2. Apply solder paste

    Apply a bit of paste to the pads where you’ll be attaching the parts. You don’t want solder paste sitting out in the open for too long, but don’t worry much about this…just don’t leave it sitting for over an hour or so. A bit of paste goes a long way. For fine-pitch chips, smear a bit of paste over all the pads. You’ll know if you put too much paste on if you end up with lots of solder bridges later.

  3. Consider using the pre-heater

    If you have a difficult component like a big chip with lots of tiny leads, you might want to use the pre-heater.  In that case, put your PCB securely over the pre-heater. Adjust the heat so the solder warms and spreads out, but does not actually melt.

  4. Place the parts using tweezers

    Try to be precise, but don’t worry if the parts aren’t exactly centered on the pads – surface tension will take care of that. This goes without saying, but make very, very sure you place all the parts on the right pads, in the correct orientation. It is just so much easier to avoid mistakes in the beginning than to go through hours of debugging only to discover you placed a part backwards. Everybody does this from time-to-time.

  5. Solder the parts

    Adjust the hot air to the middle of its temperature range. Adjust the flow so it’s pretty low – you don’t want to blow the parts off of the pads. Apply the hot air uniformly around each part, holding the nozzle about 10 cm or so above the component. You should see the solder reflow after about 5 seconds or so if everything is adjusted right. What you’re looking for is the part to literally be pulled into position by the surface tension of the molten solder. Make sure all the pads have melted. If things aren’t melting after about 10 seconds, crank up the heat a bit. I keep the air flow pretty low.

  6. Cool and inspect

    Remove the heat and, once you’re done with all the soldering in this batch, let the PCB cool naturally and inspect. You’re looking for two issues: (i) leads that are not soldered securely onto their pads and (ii) solder bridges. For (i), you should be able to see a gap (with magnification this is much easier) between the lead and the pad, or a very thin filament of solder that could easily become a hard-to-find bug when it breaks. If you find this, just apply a tiny amount of additional solder paste and repeat. For (ii), this can be a bit harder, especially for fine-pitch components. My first attempt to fix is to just heat it again using hot air. If that doesn’t work, I gently nudge the piece with a pair of tweezers while heating it with the hot air with my other hand while the solder is liquefied. This usually does the trick by essentially jiggling all the liquid solder into place. If that fails, you can use a very thin blade to gently cut the bridge.

  7. Test the leads

    Use your multimeter to test a good (at least conducting) solder joint by placing one probe on the component lead itself and the other on the trace it attaches to. You should see very low resistance (or if using the audio circuit detector, you should hear the beep). This is a great way to avoid hard-to-find bugs later on.

  8. Fixing errors

    If you mess up and need to remove a component, just heat it up with hot air while gently pulling up on the component with your tweezers. It should come off easily after a few seconds. If you have a bigger part that is hard to uniformly heat with hot air, use the pre-heater as well. Once the part has separated, use solder wick to clean up any excess solder left on the pads (this may not be necessary if there’s just a small amount).

  9. Wash the board

    Wash the board with isopropyl alcohol once you’re done. This removes flux residue. I use Q-Tips and generous amounts of alcohol.

One more word on the toaster oven reflow method that many people use. I tried this but just didn’t find it as useful, particularly when you have dozens of components to solder on to a single PCB. I find it easier to work in batches rather than needing to do the entire board in one go. It suits my short attention span better*, and you can fix any problems right after you solder a batch rather than waiting until the entire board is cooked. And if you use the oven method and then need to fix something afterwards, you’re back to using hot air anyway. So I’d just stick with using hot air and a soldering iron for everything and would dispense with the toaster oven.

That’s it. This procedure got me through the entire construction process of the Vector Network Analyzer and some other projects as well. These are all great tools to have and should get you through many years of electronics projects.

* I find that often my motivation is inversely proportional to the length of the work-reward cycle. If you work in small batches, this cycle is tighter, and it’s easier to stay focused and motivated. The reward is watching surface tension literally just pull the part right into place – that just never gets old! The other reward is doing a small batch of work, testing, fixing, and getting everything to work. Don’t wait too long between tests!

Why Being A Lazy Athlete Is Awesome

dionysus

Dionysus – An Early Lazy Athlete

Michael Jordan said that part of being a professional athlete is doing what you love, even when you don’t love doing it. So why not live up to the converse – being an amateur athlete is about doing what you love, only when you love doing it!  I love to run, bike, swim, climb, and surf, but I don’t like training. Training feels like work, but sports for me are for fun and fitness. Once you set goals for your sports, it becomes like a job, complete with the guilt that goes along with feeling like you’re not working hard enough. I think most athletes I know who compete have this sort of goal-oriented mindset – they want to hit a particular time, or qualify for a major race, or place in their age group. The language of fitness and competition is filled with words about fulfilling your goals, losing X amount of weight, or completing a given distance.

apollo

Apollo – Clearly Another Lazy Athlete

All of that is fabulous if these are the things that motivate you.. But I’d like to propose an alternative way of approaching sports – that of the Lazy Athlete. A Lazy Athlete is one who doesn’t care about times, competition, training, metrics (other than for curiosity), or goals, but does sports purely for the fun of it. Naturally, this rules you out of some of the longer races like marathons, half-Ironmans, and the like, but the up side is that you don’t really have to train! I participate in a host of events each year, from half-marathons to cycling events to olympic and sprint triathlons, but have never really trained in the sense of having a schedule and goals. I try to maintain a good mix of running, cycling, and swimming, and try not to have too many consecutive days of not exercising. If I have a longer-distance run coming up, I’ll throw in a couple of 10-12 mile runs, but other than that I won’t think much more about it. I listen to my body – if I don’t feel like doing a long run, I don’t do it.

Does this limit me from competing at my potential? Absolutely! But so much is gained in exchange – total freedom from guilt, complete relaxation on race-day, and most importantly, the feeling like I could maintain this routine for many decades. For me, exercise is like brushing your teeth – it’s mandatory, and something you need to get used to doing every single day…for your entire life. Lazy Athletes have sublime patience, because we have many years to compete in the events we want. Instead of having a particular time goal, my objective is to participate in races in interesting and beautiful places around the world. The fitness industry seems to be particularly geared to setting goals, but there is a real freedom when you get rid of goals and just do stuff for the hell of it.

I have deep admiration for professional athletes and dedicated amateurs who devote countless lonely hours of hard work to their sport. But for those who think this is the only way you can compete in races, I say be Lazy! Sure you won’t win your age group, but think about all you get in return!

Little Tahoma

LittleTLittle Tahoma is the third highest mountain in Washington. It’s Rainier’s little sidekick, which is exactly what it looks like when you view the mountain from Seattle. But there could be a hundred people climbing Rainier any given summer day and Little T will be almost deserted.

Our approach was via the White River Trailhead. It’s a couple of miles on good trail to Summerland (the first bit is really quite flat, followed by a few switchbacks). Summerland is a delightful meadow area with a number of overly-friendly marmots.

From there, you leave the trail and ascend two somewhat steep snowfields to a very picturesque mesa. It’s actually one of the coolest base camps I’ve ever seen – you camp on dirt and gravel almost in the shadow of Little T. One thing to note, though, is that after the first couple of miles, the rest of the trip is totally devoid of shade. As with many summer glacier climbs, staying cool and un-sunburned is a far greater concern than staying warm…

mjw_6801

I recently bought a new Fly Creek ultralight 2-person tent from Big Agnes and have been using this in lieu of a bivy sack since the thing only weighs about 2 pounds. My thinking was that I’d sleep better in my own 2-person tent than either (i) a bivy sack, or (ii) sharing with another big, hairy dude. In general, it has worked out well, but on this particular spot the wind kicked up a bit and the tent walls started sounding like a spinnaker in a gale. I went to bed at probably around 7 PM but did not sleep one…single…wink for the next six hours! By the time 1 AM rolled around (our wake-up time), I was actually relieved since at least it was a break in the tedium of listening to the flapping and wondering if my tent would be torn to shreds (actually, the tent did just fine and there wasn’t even that much wind…it just sounds bad).

mjw_6865 for fb

We roped up and set off across the glacier towards Little T. The mountain looks waaaaay closer than it actually is, and it took a good bit of time to get to it. We ascended a steep, crumbly rock rib and dropped down onto the glacier on the other side. Little T (and Rainier in general) is notorious for really crumbly rock – it’s pretty much as if a massive dump truck emptied its load of bowling-ball sized rocks over the entire area. So rockfall was always a concern. We stayed very close together going over the thing, on the theory that any loosened rock wouldn’t have much time to gather momentum before hitting the next guy.

mjw_6925 for fb

The sun came up behind our backs, which was a spectacular sight. We crossed the second glacier and turned right and up to start ascending a steeper part to the summit. That’s where it started getting sketchy. This year was really light on snowpack, so the conditions in the early morning were hard and scary. It’s the sort of thing where you really wished you had two ice tools instead of just the axe (that would have made it easy).

mjw_6939

We protected our route with pickets and pushed on. One section got steep enough to employ the famed “piolet panne” technique – you stick the blade in at about chest height and place your palm right on top of the adze. That allows you to essentially push vertically up on your axe to get your feet higher. I was actually fine with that, but what worried me was being roped up in such a situation – if one of the other guys on my team started to go, I wasn’t overwhelmingly confident I could arrest the fall. The pickets provided a bit of comfort, but it was a bit of a hair-raiser. I guess that’s what guides feel all the time…

mjw_7015

After ascending the steep bit, we exited the glacier to get onto the final bit of rock. After what we’d just been through, crappy crumbly rock felt like complete luxury! We scrambled up a few hundred feet to the summit, which gives you views of the massive side of Rainier as well as panoramas of all of Washington.

mjw_7056

Unfortunately, the crappy snow conditions absolutely killed our pace. We made the trek back to base camp (by then, the snow had softened up to my infinite relief) to pump water and stow our tents. It was a happy moment after so much struggle, but we still had miles to go with heavy packs before we got to the cars. That last bit of trail just kept going on and on and on – no matter what, the last 10% of any trip is just plain drudgery for me. It was dark but I just couldn’t bear to put on my headlamp (that would be admitting that yes, this was approaching an epic). We were back at the cars at 10 PM.

It was a great trip with fabulous folks, but the conditions were pretty challenging. Some of our guys who had climbed Little T three or four times before thought this was the hardest they’d seen. The lesson is how critical snow conditions are for both safety and speed. You don’t always get nice squishy plunge-stepable snow!

All photos are courtesy of Mike Warren, who has an extensive collection of mountaineering photography at www.mountaingroovephotography.com. Climbing mountains is hard. Mike does it while carrying several pounds of camera equipment!


Dragontail Colchuck Double Header

mapI actually don’t know why I signed up for this one. Climbing either Colchuck or Dragontail is a fun, but somewhat long day. Climbing both in the same day is masochistic. Anyway, I’ve written about Colchuck in an earlier post, so I won’t repeat now – it’s a cool, easy climb.

Dragontail is a tad more technical. After climbing Colchuck, we returned to the col between the two peaks and started up Dragontail. You go up a rock/alpine dirt scramble onto a steep-ish snowfield. We ascended this and then exited to the left, which puts you on the ridge. Sticking your head out over the void is pretty cool – you look right down to the snow and rock wwaaaaay down below.

We rigged a handline for some easy but exposed 4th class, and traversed the ridge. The summit is accessed by climbing up in the snow from the traverse at the correct location. From there, we descended via Aasgard Pass. Everything was just awesome until we saw some totally random and big rockfall shooting out from a gully on the east side of Dragontail. I hate Aasgard – it seems like it’s cursed with some bad voodoo. There have been a couple of recent accidents there (one involved glissading into a moat) and you feel like you’re in a bowling alley for random rockfall.

I was very happy to be down and bushwhacking through the alder by Colchuck Lake. We made our way to the trail and did the last 1.5 miles at essentially a run. This was a strong group – probably the strongest group I’ve ever climbed with. Truly an amazing group of sled dogs – we did the entire trip in 14 hours.

Photos courtesy of Nathan Johnsen.

pic4

Dragontail in the Center, Colchuck on the Right

9124115640_c91a055935_o

Looking up at Dragontail in the Fog

9121894517_9207bce012_o

Ascending from Colchuck Lake

9121890341_d748f1cbac_o

Coming up to the Col

9124103872_7d3c3e4eac_o

Colchuck Summit

pic2

Dragontail Ridge in the Fog

pic1

Dragontail Summit

pic3

Going down Aasgard Pass

9121866059_05991d2f0c_o

Colchuck Late On The Way Down

Sloan Peak

Sloan has a little of everything – stream crossings, scrambling up all sorts of rock, glacier travel, bushwhacking, route-finding, and spectacular views from the summit. It’s sometimes described as the “Matterhorn of the Cascades” because of its distinctive profile. I first saw Sloan from a peak near Stevens Pass and thought it would be a cool climb. The normal route is the “Corkscrew” route, which Beckey estimates taking around 13 hours from the trailhead. I’m sure that’s possible with a fit and very efficient team, but I’ve learned to add about 20% to Beckey’s estimates for mere mortals. It took us 15.5 hours.

Photo courtesy of Long Bach Nguyen. Long has a portfolio of fantastic photography, largely while piloting various aircraft around Seattle, at his gallery.

The trail starts with three river crossings across pieces of the north fork of the Sauk River. When we did it, the crossings were on fallen logs and weren’t too sketchy, though I can easily imagine this being a more formidable obstacle if the water level is high. As we were doing it, I kept saying to myself, “Man, I hope we don’t have to do this in the dark…” I managed to completely submerge my right foot twice, requiring me to stop and wring out my sock each time. Ugghhh…

Cougar Creek

Photo courtesy of Alixandra Lamsa.

The trail is pretty overgrown – lots of fallen logs, Devil’s Club, and creek-crossings – but when we did it there were relatively frequent flags showing the route. At first I thought the flags were annoying and detracted from the more pure wilderness route-finding experience you’d otherwise have, but I was very happy to have them on the way down. The trail ascends somewhat steeply to the first crossing of Cougar Creek, next to a spectacular cascading waterfall.

Ascending about 3000′ from the road, you come out of the trees and onto a big snow and rock covered slope. We ascended up by easy scrambling to a snowfield, put on crampons, and ascended up and across to the glacier. This trip I was experimenting for the first time carrying a 3 liter water bladder in my pack instead of my usual 2.5 liter water bottles. The bladder is lighter, fits more naturally into the pack, allows you to drink more consistently, but of course makes it hard to judge how much water you have left.

Photo courtesy of Alixandra Lamsa.

By the time we got to the first snow field, I had already drank down my 2.5 liters and had to refill from another person in our party who had extra before we all stopped to pump. After once being very dehydrated on a climb, I now drink copious amounts of water – it both keeps your athletic performance where it should be and also just makes you happier! If someone gets cranky on a climb, my first reaction is to give them water…that often solves the problem. But staying fully hydrated on a strenuous climb is difficult, if not impossible, and you need to weigh the benefits with the drawbacks of carrying additional weight and the time it takes to pump. I often add a Nuun tablet to my water as well, to help keep the electrolytes balanced.

Photo courtesy of Alixandra Lamsa.

We ate lunch at the start of the glacier, roped up, and crossed. On the Corkscrew route, you go to the upper-SW corner of the glacier and exit onto a rocky ridge with a clear trail. When we did it, there were a few crevasses, but nothing too overwhelming. The glacier wasn’t too steep, but enough for me to protect with a picket when we would travel above one of the crevasses.

We cached some gear at the corner of the glacier and proceeded on the trail. You literally “corkscrew” around the peak until you reach a loose rock filled gully. Going up that, you hit some Class 3 and 4 scrambling, but the rock quality is very good and grippy, with plenty of fine holds. We brought our 30 meter rope but never ended up using it.

Photo courtesy of Alixandra Lamsa.

The summit views are spectacular, almost surreal. It never ceases to amaze me that these scenes of pristine alpine beauty are only two hours outside of Seattle! We summited at 2 PM, 8 hours after starting. I thought we moved reasonably well, not taking a huge amount of time for breaks and lunch, but still it’s a long slog. 6200′ in a day is no joke and takes a solid level of fitness and endurance.

The descent back onto the glacier was actually easier than going up. The biggest hazard was rockfall, so we went one-by-one down the chute. Once we were back on the glacier, we opted to descend much farther on easy snow to avoid having to scramble down the rocky slabs that we came up on. If you go NNE and aim for the left-hand side of an obvious and cliffy ridge, there’s a well worn trail. Of course, by then we were all out of water, which just makes everything harder. Once we were off of the glacier, we had another rock scramble down a crumbly slope, after which we finally pumped at a stream. It’s amazing how fresh water, a powerbar, and a Cliff Double Espresso gel can improve your entire outlook! From there, we rejoined the trail for the long slog back down. By the time we got back to the river, we had headlamps on, and re-crossing those log bridges in the dark was…interesting. Add to that a pretty serious level of fatigue and soreness and you really want to be careful. There’s no shame in the Butt-Scoot…

Photo courtesy of Alixandra Lamsa.

There were a few lessons learned for me on the trip:

1. I’d suggest starting at 5 AM and moving as efficiently as possible to avoid having to travel with headlamps on the way down. Even better, there were some really nice campsites along the way. I think a two day climb of Sloan would be pretty comfortable!

2. I need tons of water on a strenuous climb. Next time I’d pump earlier so I wouldn’t get as dehydrated on the way down. It’s certainly a time-suck to pump, but I think this is justified by being happier and stronger.

3. I chafed the hell out of my thighs and ankles. The same thing happened the previous weekend on an overnight backpack – something about my skin being in long-term contact with wet, salty clothing doesn’t agree with me. By the time we got back, it was really painful and I was totally gimp-ified. It was a relief to put on normal shorts and sandals! I was surprised by this since I’ve wore the very same stuff on my 30-day NOLS trip without too much trouble. Maybe it was the sheer duration of this particular climb… So I ordered synthetic, tight-fitting, moisture-wicking shorts (amazing what there is in clothing technology these days), better socks, and BodyGlide, which I’ve seen people use on marathons. I’ll try it on my feet, ankles, and legs to see if it makes a difference.

Sporting the Alchemist 40 pack.
Photo courtesy of Alixandra Lamsa.

4. I tried a new pack for this trip – the First Ascent Alchemist 40. I’d been using two packs – a 105L Lowe Alpine Contour IV and a hand-me-down 47L Kelty Redwing. The Lowe Alpine pack was my NOLS pack that I’ve had for 15+ years. It’s super-durable, huge, and reliable. But as the trend in mountaineering is towards lighter and faster, it’s actually hard to find these gigantic packs anymore. For a one day trip, even with rope, rack, water, etc., it’s massive overkill. Because it’s only partly filled, it doesn’t ride well at all. And of course it weighs a ton. The Kelty pack is also super-durable, but is still a bit large for a one-day trip and wasn’t really meant for carrying rope, pickets, ice axe, and the like – it’s more for backpacking around Europe. The Alchemist is a bit on the heavy side and had a bunch of features, which was actually a disadvantage in my eyes (features = failure-points). I was tempted by the Osprey Hornet 46, which weighs a mere .46 kg, but you aren’t really supposed to carry more than 30 lbs. in it. As soon as you add rope, rack, pro, harness, and the like, you easily pushing into that range, so that pack wouldn’t really work for climbing. I settled on the Alchemist because it expands from 40 to 55 liters, has a built-in bivy/sit pad, and is designed around climbing. I was pretty happy with it – my gear fit easily inside (I didn’t use my normal trash compactor bag to waterproof, since it seems like the pack is reasonably waterproof already) and it’s easy to quickly lash on a rope, stow/deploy your ice axe, and clip on pickets. I also didn’t have any back fatigue at all after the trip, which was a big problem with my other packs – I think the Alchemist distributes the weight pretty well.

Photo courtesy of Alixandra Lamsa.

The one big problem I had, though, was that the quick-release ice axe/tool straps (in theory letting you grab your axe/tool without someone else’s help) were waaaay…too…quick-to-release! I re-attached my axe at least ten times when it would snap off while crawling under a tree. That’s a big problem for any sort of alpine-style climbing when you’re bushwhacking through forest, as you could accidentally leave your axe back on the trail… I’m fixing it by putting the axe through the quick release loop itself, which isn’t how it was meant to be used, but that’s a hell of a lot better than worrying about losing the axe! The other problem I had was the low-padding belt strap. With shorts, this can really eat into your skin and I had an angry-looking red rash after the climb just from the waist strap. It’s best to wear something else between the belt and your skin.

Sloan is a great peak for a real alpine experience, and offers a bit of everything. There are a number of rock variations you can do as well to get to the summit. For me, I’ll probably do it as a two day trip in the future, just because I like a more leisurely pace and would rather carry overnight gear to a base camp than push through all in one day. The views on a clear day are unbeatable.

Gallery photos courtesy of Alixandra Lamsa.

Sloan Peak

[img src=https://www.ehrenbrav.com/wp-content/flagallery/sloan-peak/thumbs/thumbs_620443_623542488736_560360326_o.jpg]21440
[img src=https://www.ehrenbrav.com/wp-content/flagallery/sloan-peak/thumbs/thumbs_464814_623542518676_1187374841_o.jpg]20530
[img src=https://www.ehrenbrav.com/wp-content/flagallery/sloan-peak/thumbs/thumbs_621892_623542543626_1217497701_o.jpg]20000
[img src=https://www.ehrenbrav.com/wp-content/flagallery/sloan-peak/thumbs/thumbs_210756_623542598516_1185277586_o.jpg]19660
[img src=https://www.ehrenbrav.com/wp-content/flagallery/sloan-peak/thumbs/thumbs_616947_623542618476_1659966178_o.jpg]19240
[img src=https://www.ehrenbrav.com/wp-content/flagallery/sloan-peak/thumbs/thumbs_192274_623542643426_1132692401_o.jpg]18910
[img src=https://www.ehrenbrav.com/wp-content/flagallery/sloan-peak/thumbs/thumbs_622387_623542663386_1262042607_o.jpg]18710
[img src=https://www.ehrenbrav.com/wp-content/flagallery/sloan-peak/thumbs/thumbs_614647_623542683346_548558124_o.jpg]18600
[img src=https://www.ehrenbrav.com/wp-content/flagallery/sloan-peak/thumbs/thumbs_202696_623542698316_1658348956_o.jpg]18440
[img src=https://www.ehrenbrav.com/wp-content/flagallery/sloan-peak/thumbs/thumbs_326643_623542763186_1072990588_o.jpg]18340
[img src=https://www.ehrenbrav.com/wp-content/flagallery/sloan-peak/thumbs/thumbs_622497_623542773166_158672657_o.jpg]18150
[img src=https://www.ehrenbrav.com/wp-content/flagallery/sloan-peak/thumbs/thumbs_202519_623542823066_1672447045_o.jpg]18160
[img src=https://www.ehrenbrav.com/wp-content/flagallery/sloan-peak/thumbs/thumbs_578758_623542848016_1579607775_n.jpg]18120
[img src=https://www.ehrenbrav.com/wp-content/flagallery/sloan-peak/thumbs/thumbs_327884_623542867976_783405149_o.jpg]17980
[img src=https://www.ehrenbrav.com/wp-content/flagallery/sloan-peak/thumbs/thumbs_191894_623542942826_1469971361_o.jpg]17870
[img src=https://www.ehrenbrav.com/wp-content/flagallery/sloan-peak/thumbs/thumbs_340362_623542957796_265024474_o.jpg]17800
[img src=https://www.ehrenbrav.com/wp-content/flagallery/sloan-peak/thumbs/thumbs_337792_623542987736_414096256_o.jpg]17740
[img src=https://www.ehrenbrav.com/wp-content/flagallery/sloan-peak/thumbs/thumbs_280962_623543002706_1977625124_o.jpg]17640
[img src=https://www.ehrenbrav.com/wp-content/flagallery/sloan-peak/thumbs/thumbs_329649_623543047616_1548142791_o.jpg]17550
[img src=https://www.ehrenbrav.com/wp-content/flagallery/sloan-peak/thumbs/thumbs_456519_623543072566_444996622_o.jpg]17570
[img src=https://www.ehrenbrav.com/wp-content/flagallery/sloan-peak/thumbs/thumbs_169555_623543097516_84593080_o.jpg]17510
[img src=https://www.ehrenbrav.com/wp-content/flagallery/sloan-peak/thumbs/thumbs_620488_623543112486_1556426092_o.jpg]17450
[img src=https://www.ehrenbrav.com/wp-content/flagallery/sloan-peak/thumbs/thumbs_333969_623543132446_889698848_o.jpg]17380
[img src=https://www.ehrenbrav.com/wp-content/flagallery/sloan-peak/thumbs/thumbs_614572_623543142426_140076932_o.jpg]17340
[img src=https://www.ehrenbrav.com/wp-content/flagallery/sloan-peak/thumbs/thumbs_210763_623543162386_358897274_o.jpg]17280
[img src=https://www.ehrenbrav.com/wp-content/flagallery/sloan-peak/thumbs/thumbs_614651_623543192326_2106139238_o.jpg]17230
[img src=https://www.ehrenbrav.com/wp-content/flagallery/sloan-peak/thumbs/thumbs_621595_623543207296_226565887_o.jpg]17100
[img src=https://www.ehrenbrav.com/wp-content/flagallery/sloan-peak/thumbs/thumbs_621075_623543227256_1397750922_o.jpg]17060
[img src=https://www.ehrenbrav.com/wp-content/flagallery/sloan-peak/thumbs/thumbs_621887_623543302106_2133034337_o.jpg]16970
[img src=https://www.ehrenbrav.com/wp-content/flagallery/sloan-peak/thumbs/thumbs_278401_623543327056_815044843_o.jpg]16920
[img src=https://www.ehrenbrav.com/wp-content/flagallery/sloan-peak/thumbs/thumbs_322069_623543342026_863997096_o.jpg]16910
[img src=https://www.ehrenbrav.com/wp-content/flagallery/sloan-peak/thumbs/thumbs_326544_623543361986_882227959_o.jpg]16830
[img src=https://www.ehrenbrav.com/wp-content/flagallery/sloan-peak/thumbs/thumbs_411513_623543376956_1111694820_o.jpg]16770
[img src=https://www.ehrenbrav.com/wp-content/flagallery/sloan-peak/thumbs/thumbs_616805_623543416876_1006413360_o.jpg]16740
[img src=https://www.ehrenbrav.com/wp-content/flagallery/sloan-peak/thumbs/thumbs_522040_623543431846_1450116473_n.jpg]16750
[img src=https://www.ehrenbrav.com/wp-content/flagallery/sloan-peak/thumbs/thumbs_337778_623543451806_2034712814_o.jpg]16640
[img src=https://www.ehrenbrav.com/wp-content/flagallery/sloan-peak/thumbs/thumbs_627327_623543501706_1190097480_o.jpg]16610
[img src=https://www.ehrenbrav.com/wp-content/flagallery/sloan-peak/thumbs/thumbs_278467_623543561586_392151091_o.jpg]16540
[img src=https://www.ehrenbrav.com/wp-content/flagallery/sloan-peak/thumbs/thumbs_556502_623543641426_1963963174_n.jpg]16560
[img src=https://www.ehrenbrav.com/wp-content/flagallery/sloan-peak/thumbs/thumbs_621788_623543711286_1354612674_o.jpg]16540

Upper Royal Lake Basin

Upper Royal Lake Basin is one of the most picturesque areas of the Olympics. We did it as an overnight backpack, starting from the Dungeness Trail parking lot. The trip is about 2500′ elevation gain (if I’m remembering right) and 8 miles or so each way along a well-maintained trail.

Probably the most challenging part of this trip is simply finding the trailhead. You exit 101 via Palo Alto road and travel on several Forest Service roads to get there. Unfortunately, the roads are very poorly marked and the instructions that the Forest Service hands out when you get your permit (also accessible online) are wrong and confusing. We just followed the most well-used of the roads, and followed what signs there were to the Dungeness Trails. A GPS with a background map of the area would solve the problem. It’s funny since I had all sorts of detailed maps of our route printed out – I never thought just finding the damn trailhead would be so hard!
The route starts on the Dungeness Trail and then follows the Royal Creek up the valley. By the time we reached Royal Lake, we were absolutely swarmed by mosquitoes and horse flies. It was some of the worst I’ve ever seen – we jumped into the lake to get away from them for a bit, which was a huge relief.

The Park Service makes you carry a bear can. Since we had four people in our party, I opted for the larger container, which is essentially like carrying a water cooler tank in your pack. Hope you have room… Anyway, the damn thing weighs a ton! In the olden days in the Sierras, we’d just string our food in a tree. This of course has its own drawbacks (we once saw a mother bear send her light-weight cub up the tree to retrieve the food), but it would enable you to dispense with the can that’s just painful to carry.

From Royal Lake, we pumped water and ascended another mile or so to the Upper Basin. There is a little glacial lake there along with lots of moraine, meadows, and marmots. The bugs were relentless, so we set up our tent as soon as we arrived and I put on my head net, rain jacket and pants, and tried to make do. I don’t use repellent since I hate the idea of having that stuff on my skin and clothes, and I think the other people who did use it got bitten just as badly. As soon as bare skin is exposed for more than about five seconds, it becomes covered with bugs. They let up a tiny bit at night, when the all perched on top of the mesh of our tent, eyeing us hungrily with their little probosces just waiting for the chance…

The Park gave us a crude map of the Upper Basin indicating where to camp. We thought were were doing exactly what we were supposed to (camping on bare ground, not in the “No Camping” areas on the map), but about 8 PM at night the backcountry ranger came and told us we needed to move! Wow – that’s never happened to me before. We were already in our tents and I was pretty pissed that he hadn’t told us way earlier. Besides, elsewhere there were signs indicating no camping and we were camped in an obvious spot that appeared to follow all the directions of the map. Oh well… Fortunately, he said after a bit of scouting that we wouldn’t need to move after all. That’s not much of a backcountry experience…we might as well be car camping! The Park has gone overboard with these sorts of rules – they should control environmental impact in the wilderness (which we are always scrupulous in minimizing) by the number of wilderness permits they issue, not by dictating precisely where a party should camp! 

But apart from this, the area is magnificently beautiful, with Mt. Deception and the Needles just overhead. I’d love to go back sometime when the bugs aren’t as bad to use the Upper Basin as a base camp for climbing the nearby peaks. There are also some off-trail routes that sound pretty interesting – the Dungeness Trail area can get pretty crowded in summer time and getting just a bit off the beaten track is a great way to escape the crowds. Mostly, the climbs of Mt. Deception and some of the Needles (including the aptly-named Incisor) are definitely on my list for a future trip.

Photos courtesy of Tyler Albert.

Upper Royal Lake Basin

[img src=https://www.ehrenbrav.com/wp-content/flagallery/upper-royal-lake-basin/thumbs/thumbs_img_2407.jpg]22610
[img src=https://www.ehrenbrav.com/wp-content/flagallery/upper-royal-lake-basin/thumbs/thumbs_img_2414.jpg]21860
[img src=https://www.ehrenbrav.com/wp-content/flagallery/upper-royal-lake-basin/thumbs/thumbs_img_2418.jpg]21440
[img src=https://www.ehrenbrav.com/wp-content/flagallery/upper-royal-lake-basin/thumbs/thumbs_img_2419.jpg]21090
[img src=https://www.ehrenbrav.com/wp-content/flagallery/upper-royal-lake-basin/thumbs/thumbs_img_2423.jpg]20760
[img src=https://www.ehrenbrav.com/wp-content/flagallery/upper-royal-lake-basin/thumbs/thumbs_img_2426.jpg]20430
[img src=https://www.ehrenbrav.com/wp-content/flagallery/upper-royal-lake-basin/thumbs/thumbs_img_2431.jpg]20270
[img src=https://www.ehrenbrav.com/wp-content/flagallery/upper-royal-lake-basin/thumbs/thumbs_img_2432.jpg]20100
[img src=https://www.ehrenbrav.com/wp-content/flagallery/upper-royal-lake-basin/thumbs/thumbs_img_2433.jpg]19980
[img src=https://www.ehrenbrav.com/wp-content/flagallery/upper-royal-lake-basin/thumbs/thumbs_img_2435.jpg]19830
[img src=https://www.ehrenbrav.com/wp-content/flagallery/upper-royal-lake-basin/thumbs/thumbs_img_2437.jpg]19800
[img src=https://www.ehrenbrav.com/wp-content/flagallery/upper-royal-lake-basin/thumbs/thumbs_img_2439.jpg]19700
[img src=https://www.ehrenbrav.com/wp-content/flagallery/upper-royal-lake-basin/thumbs/thumbs_img_2440.jpg]19640
[img src=https://www.ehrenbrav.com/wp-content/flagallery/upper-royal-lake-basin/thumbs/thumbs_img_2443.jpg]19490
[img src=https://www.ehrenbrav.com/wp-content/flagallery/upper-royal-lake-basin/thumbs/thumbs_img_2445.jpg]19390
[img src=https://www.ehrenbrav.com/wp-content/flagallery/upper-royal-lake-basin/thumbs/thumbs_img_2448.jpg]19270
[img src=https://www.ehrenbrav.com/wp-content/flagallery/upper-royal-lake-basin/thumbs/thumbs_img_2452.jpg]19170
[img src=https://www.ehrenbrav.com/wp-content/flagallery/upper-royal-lake-basin/thumbs/thumbs_img_2454.jpg]19130
[img src=https://www.ehrenbrav.com/wp-content/flagallery/upper-royal-lake-basin/thumbs/thumbs_img_2458.jpg]18960
[img src=https://www.ehrenbrav.com/wp-content/flagallery/upper-royal-lake-basin/thumbs/thumbs_img_2466.jpg]18940
[img src=https://www.ehrenbrav.com/wp-content/flagallery/upper-royal-lake-basin/thumbs/thumbs_img_2470.jpg]18810
[img src=https://www.ehrenbrav.com/wp-content/flagallery/upper-royal-lake-basin/thumbs/thumbs_img_2471.jpg]18680
[img src=https://www.ehrenbrav.com/wp-content/flagallery/upper-royal-lake-basin/thumbs/thumbs_img_2475.jpg]18610
[img src=https://www.ehrenbrav.com/wp-content/flagallery/upper-royal-lake-basin/thumbs/thumbs_img_2479.jpg]18560
[img src=https://www.ehrenbrav.com/wp-content/flagallery/upper-royal-lake-basin/thumbs/thumbs_img_2481.jpg]18510
[img src=https://www.ehrenbrav.com/wp-content/flagallery/upper-royal-lake-basin/thumbs/thumbs_img_2488.jpg]18600
[img src=https://www.ehrenbrav.com/wp-content/flagallery/upper-royal-lake-basin/thumbs/thumbs_img_2490.jpg]18490
[img src=https://www.ehrenbrav.com/wp-content/flagallery/upper-royal-lake-basin/thumbs/thumbs_img_2495.jpg]18350
[img src=https://www.ehrenbrav.com/wp-content/flagallery/upper-royal-lake-basin/thumbs/thumbs_img_2496.jpg]18290
[img src=https://www.ehrenbrav.com/wp-content/flagallery/upper-royal-lake-basin/thumbs/thumbs_img_2501.jpg]18380
[img src=https://www.ehrenbrav.com/wp-content/flagallery/upper-royal-lake-basin/thumbs/thumbs_img_2502.jpg]18250
[img src=https://www.ehrenbrav.com/wp-content/flagallery/upper-royal-lake-basin/thumbs/thumbs_img_2503.jpg]18260

Alureon.a Hell

How I Finally Got Rid Of This Evil, Insidious, Irksome, Malicious, Time-Wasting, God-Awful Virus That Can Ruin Your Computer, Steal Your Passwords, Take Control of Your Hard Drive, Delete Your Files, and Rob Hours of Your Valuable Time

I just spent about 5 hours cleaning the alureon.a trojan off an infected Windows 7 machine. This is a very, very insidious virus, which can infect the master boot record, disable anti-virus software, spoof DNS entries in order to steal usernames, passwords, and credit cards, and it can corrupt random files.

Here’s How We Learned of and Finally Fixed the Infection:

1. We have an up-to-date version of Norton 2012 Internet Security running on the Windows machine. It indicated no problems at all, even after routine full system scans! Norton totally failed to catch this threat.

2. We started to see occasional blue-screen-of-death problems with the machine, which prompted me to do a Windows Update. I noticed when doing this that several of the downloaded updates had failed to install. I got a useless error code of FFFFFFFE – Unknown Error, which wasn’t explained in any of the Microsoft documentation. Hmmm… Checking the Windows Update logs, there were three updates, stretching back to April, that had not been successfully installed. I just couldn’t get these to install after repeated attempts – each time I’d get the same nonsensical error.

3. I downloaded and updated the free Microsoft Security Essentials (MSE) utility from here. It indicated that the computer had been infected with “Trojan:DOS/Alureon.a” and offered to clean it. That was the first concrete indication that there was any infection at all.

4. I applied this fix that MSE offered but was told that the virus could not be completely removed until I downloaded and ran the “Windows Defender Offline” utility. In order to run this, you need to burn the executable onto a CD.

5. I booted the machine using this CD and used the utility to do a full system scan. It did not find any problems.

6. Upon restarting the machine, the Microsoft Security Essentials utility again indicated an infection. I went through this cycle two or three times again – MSE would show that there was an infection, offer to clean it, say it was cleaned and that the machine needed to be restarted, but when I did this, the same thing would happen again.

7. I scrupulously followed the manual master boot record repair instructions on Microsoft’s support forum here. In order to do so, you need to use a Windows 7 CD to boot the machine, open a command line and run the bootrec command to manually repair and rebuild the master boot record. Upon a restart, MSE again found the trojan.

8. I finally downloaded a removal utility called TDSSKiller from here. I ran this, which indicated the presence of Rootkit.Boot.Pihar.c. I’m not sure if this is a separate trojan or just an alias for alureon.a…but I used the utility to repair the machine and future scans came up clean.

Conclusion: Only TDSSKiller seems to be able to fix this problem. Norton, MSE, and the manual instructions provided by Microsoft all failed. Norton didn’t even detect the problem. This is a very, very sophisticated virus, and it can infect you without your knowledge, without standard anti-virus applications knowing about it, and it is maddeningly difficult to remove. I think ultimately the best way of catching this is to ensure all Windows updates have been downloaded and successfully installed. I wish Windows would throw a bigger warning if an update failed to install, as that should not normally happen.

Lessons Learned: We’re very careful about opening attachments, visiting suspicious sites, etc. Nevertheless, the computer was infected. I think the one thing we should have done differently that probably would have prevented the infection would be to have our day-to-day user account not be an admin account. I of course do this on my linux machines, which are my primary computers – but Windows just defaults to have the account you set up have root privileges! I should have caught this problem but didn’t. And I’m not convinced it would have prevented the infection (though I think it would have), but it might have at least alerted us that something weird was going on with a webpage/USB trying to modify a system file.


Whidbey Island Triathlon

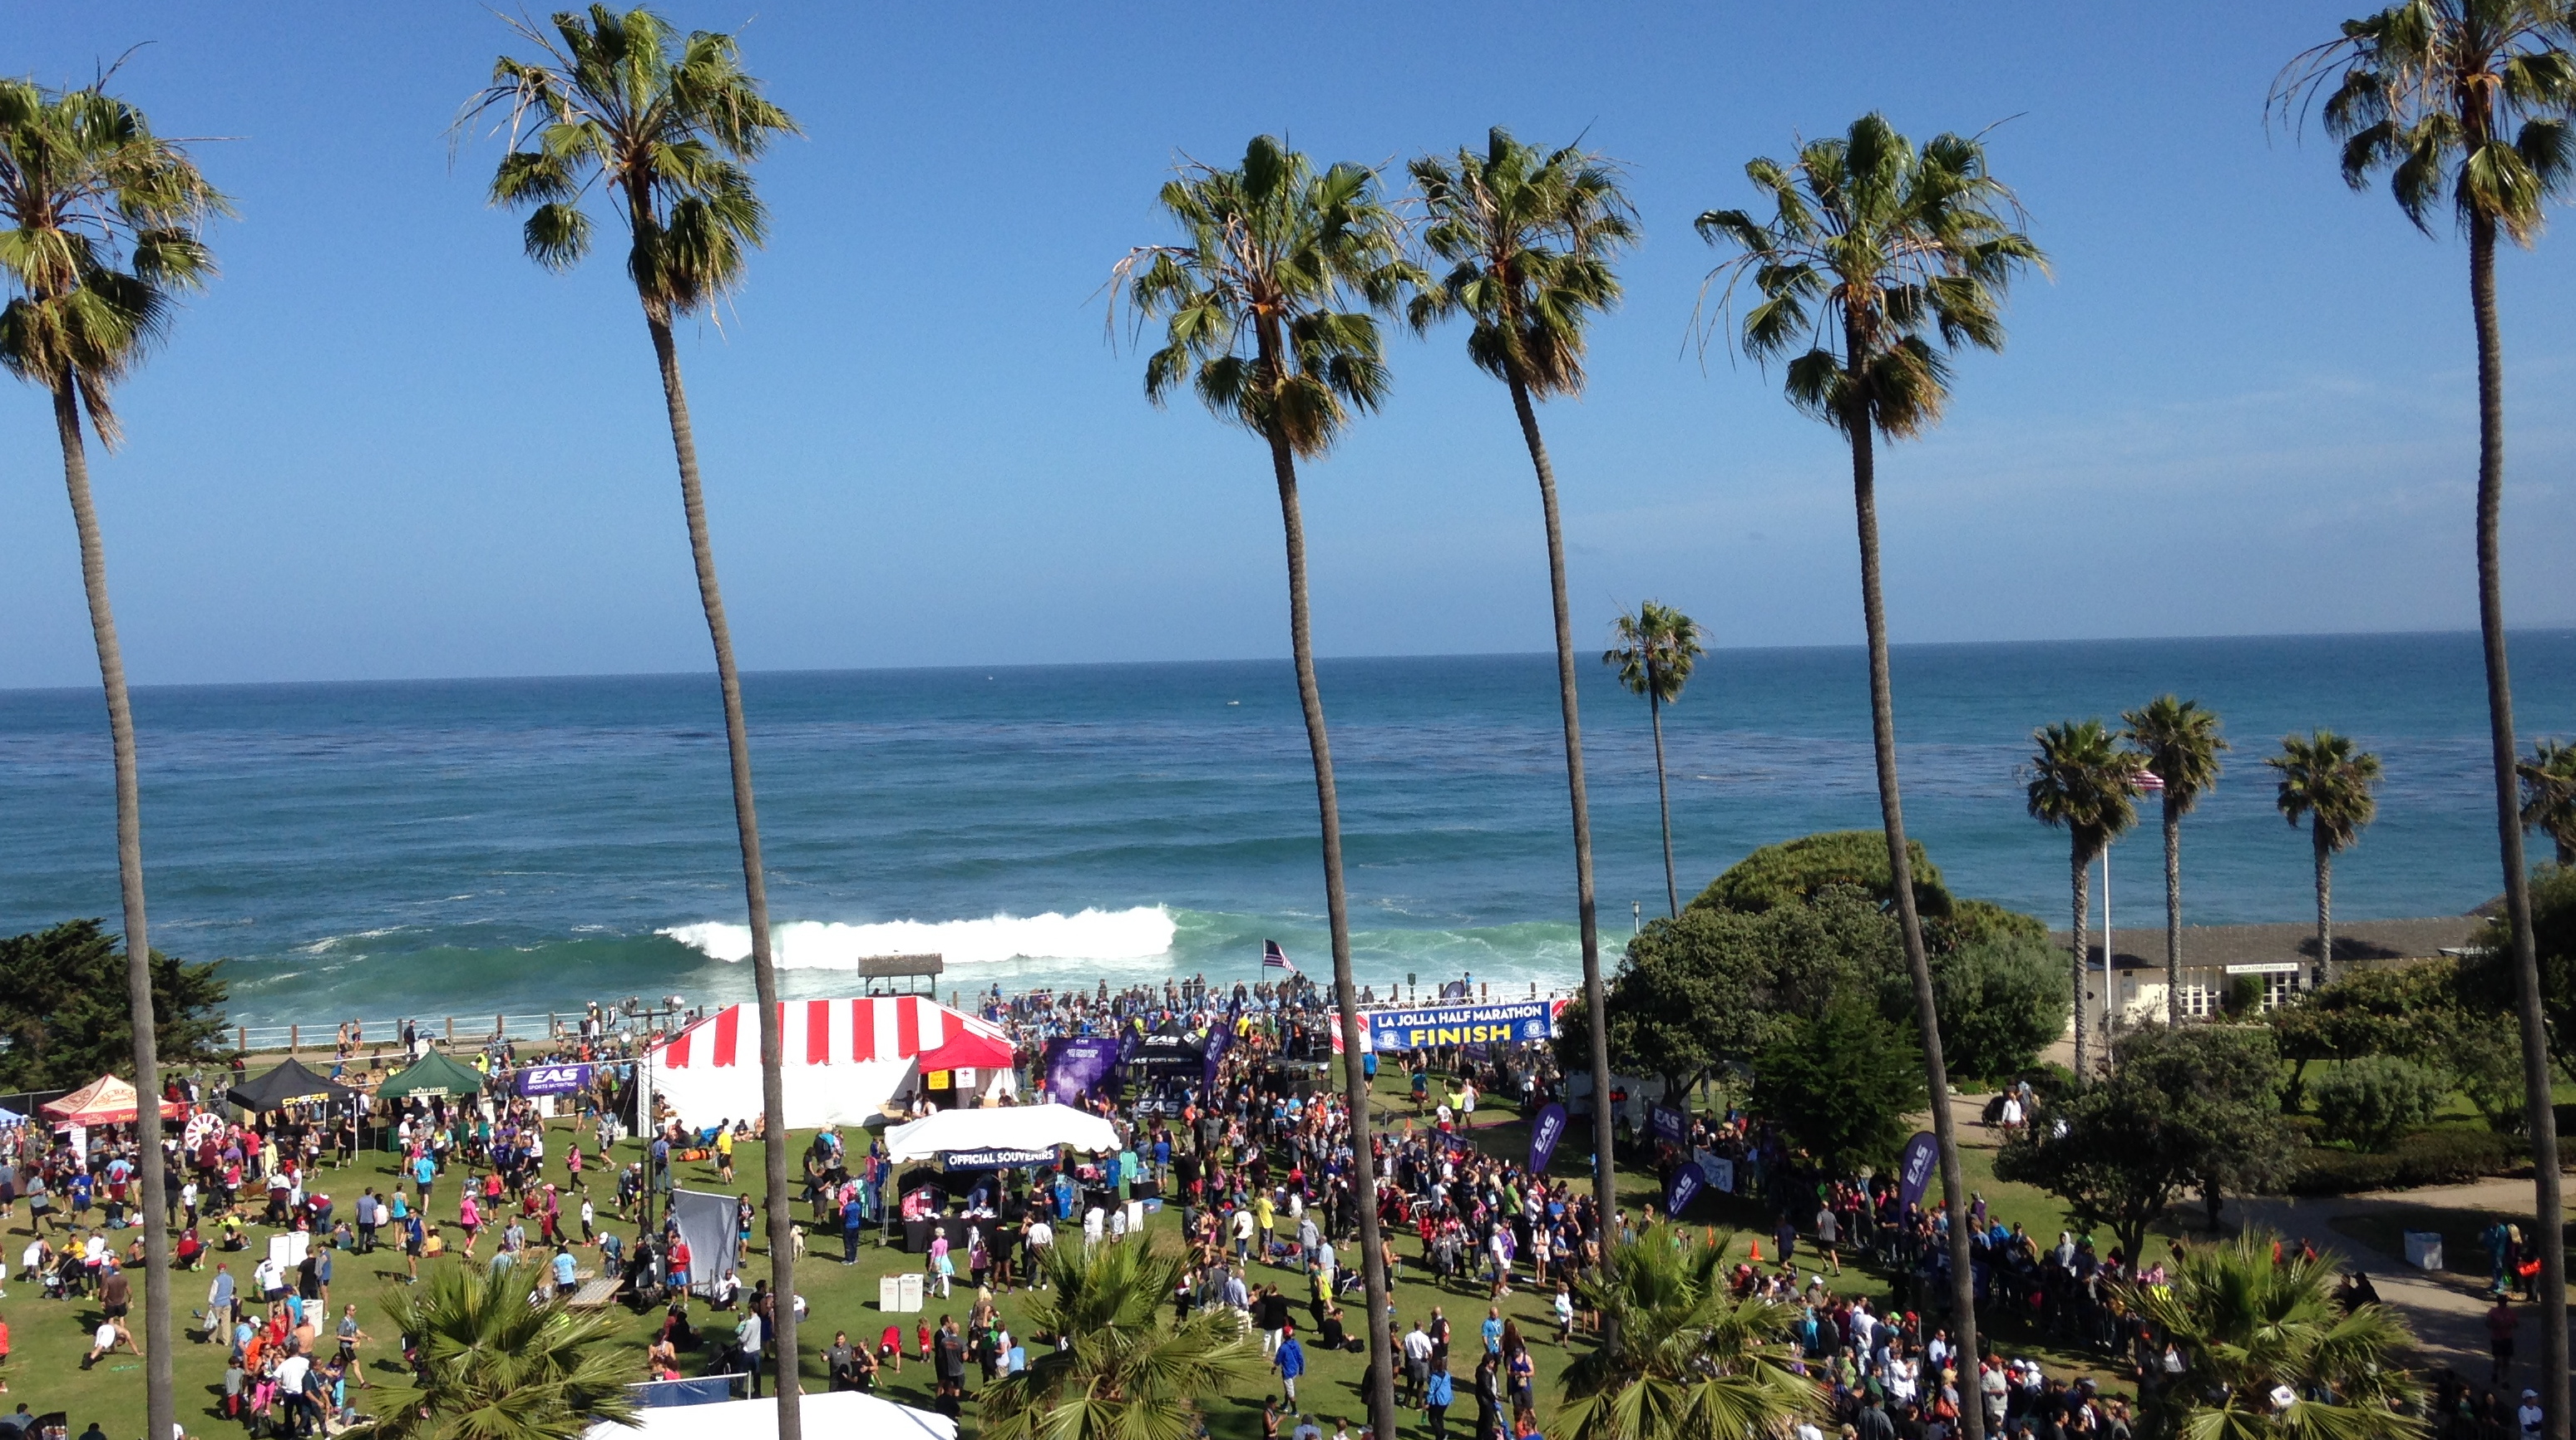
This was my second triathlon, and was a hell of a lot harder than the first! The Whidbey swim is the normal .5 miles, but the bike course is longer at 19.5 miles and has a couple of decent hills. They say it’s a really beautiful route as well, but I didn’t really notice as most of the race I was in more of a survival-oriented mindset and just didn’t look around nearly as much as I should have.

Setting up the logistics of a triathlon can take a bit of planning. Here, because the first and second transition areas were in different locations that were several miles apart, we needed to plan out how to register, set up all the gear, get the car where we wanted it, and get ourselves to the start line. That involved registering in one place, driving to another, riding our bikes to the transition area with our swim gear, walking back to the car, driving to the parking area, walking to the run transition area, walking back to the car to get changed, and then walking to the shuttle pick-up to catch the bus to the start line. Well, despite being there 2.5 hours early, we barely made it on time to the start!

The swim went well, though not quite as well as the Seafair tri. I didn’t wear a wetsuit and am wondering if that somehow slowed me down a bit. Perhaps the buoyancy of the suit gets more of you out of the water, reducing drag enough to overcome the added resistance from the neoprene. I’ve actually come to enjoy the chaos of the swim start – it can get a bit rough, the water can be choppy, your goggles fog up, and you need to deal with navigating while all the time pushing hard to maintain your pace – but each time after leaving the water, I’ve been pretty discombobulated. Like last time, I was a bit dizzy from all the jostling around and needed to make the mental shift to bike riding. It’s actually kind of hard, and each time I’ve worried about falling right off my bike as soon as I start riding.

I left the transition area doing pretty well, but then all hell broke loose… At Seafair, I got passed like crazy on the bike, often by those fancy and expensive tri bikes (naturally, if I could afford it, I’d have one too) and I was determined not to have that happen again. No sooner did I start going down the first hill than one of those very bikes zipped by me with that irksome whir that sounds like a jet engine compared to my little VW bug. At the bottom of the hill was a T-intersection. I followed the rocket bike as closely as I could down the hill and cornered aggressively around the turn. Well, as soon as I started that my back tire skidded out. Fortunately, I didn’t totally wipe-out but I did manage to ride right off the road, over a ditch, and into some bushes.

I don’t remember much at that point, being still dazed from the swim and my off-road excursion, but I do remember some people clapping and congratulating me on not falling over! I grabbed the bike and started walking back to the road, when I noticed a hissing sound coming from the back tire. Sure enough, I had gotten a flat. That very morning we’d had a discussion about whether to bring the spare or not. On a sprint triathlon, I figured if I ever got a flat it wouldn’t be worth trying to fix and I’d just sit out the rest of the race. Well, for some reason in spite of this I brought the spare. A volunteer bike mechanic who’d strategically stationed himself right at that intersection came over to help. I’m not sure who he was, but he had a big beard and drove a pickup with his dog in the front seat. He saved my race. He got the new tire on way faster than I would have been able to and I was back in the saddle before I knew it.

I think this was post-wipeout…

I still struggled on the bike leg – I went through all my water and started to feel dehydrated, which didn’t help matters either. One of the quaint ironies about triathlon is that they write your age in big black letters on your calf, meaning you can see just how much older the guy whipping by you on the bike really is! On the one hand, it’s neat seeing the wide (and really pretty random) distribution of ages in the results, but on the other hand it can be humbling to see really fantastic athletes in their 40s, 50s, and older shoot by.

The run leg went OK and I made up some of the ground I’d lost on the bike, and I sprinted into the finish where thankfully they had plenty of liquids to get me re-hydrated on that hot day. I learned a number of things from that race that I’m sure are obvious to more seasoned racers but that were pretty revelatory for me:

Ever wonder what a cross between Henry Rollins and the Incredible Hulk would look like? Hmmmm…the angrier Brav gets, the faster Brav runs!

1. If you’re eating gels and power bars before the start, these can actually dehydrate you a bit. So I think it’s best to drink water on the bike instead of a sports drink. I actually installed a second bottle holder for the bike – I’d happily pay the price of a less aerodynamic profile for having plenty of liquids to keep me hydrated. I’ll be taking one sports drink and one plain water in the future.

2. Take the corners conservatively! I have no desire to be a professional, or even to win my age category, so there’s absolutely no sense in pushing the envelope on the bike and risking an injury that could knock out weeks of training and screw up the rest of my season (not to mention climbing, diving, and all the other stuff I love doing). It’s just not worth it.

3. I need to take time after the swim to get my riding game on. I think my transition time is fine, so I probably can devote a couple extra seconds to calming down, catching my breath, regaining my equilibrium, and coming out of the transition in a less frantic way. That’s hard when you’re pumped up from the swim and chasing every second.

4. I need to be a bit more careful about what I do the last few nights before a race. I’d had a few drinks the night before (including absinthe, if you can believe it, which one of the local pubs started carrying….mmmmm, not a great idea before a race) when I shouldn’t have had any alcohol, and I didn’t get enough sleep (catching the 5:20 AM ferry didn’t help). Before Seafair, I’d gotten tons of sleep, hadn’t consumed any alcohol for a night or two before, and felt like I had a better race.

5. I’m getting killed on the hills. I took the bike to the shop this week and put on a different cassette with a higher range of gears. Before doing this, when other athletes would talk about “spinning” up a hill, I’d more describe it as VO2-maxing up, since I’d literally gotten my heart rate right up to max trying to mash out my lowest gear. Of course, the biggest issue for me on the bike is training time. I spend probably about twice as much time swimming and running as biking. Not surprisingly, my biking is about half as good as my swimming and running!

My race buddy Rutilio sporting a Utili-kilt. Rutilio had a great race! And no, the ambulance in the background was not for me.

Ultimately, my philosophy with triathlon is pretty casual – I don’t have a training program (it’s no more specific than trying to swim twice a week, ride once, and run twice) and often I’ll substitute a training session for a mountaineering trip. I don’t want to start taking my training so seriously that it starts to get in the way of other stuff I love doing, so I pay a price in terms of race day performance. Maybe next year I’ll do a more disciplined 8 week training plan before an olympic distance race…

Anyway, the Beaver Lake tri is coming up next week, and I might add one more and maybe a few 10Ks or half-marathons before the season is over. I never thought I’d like racing so much – I’m not sure why it is, but the energy you get from racing and the sense of accomplishment after pushing yourself hard is pretty satisfying.
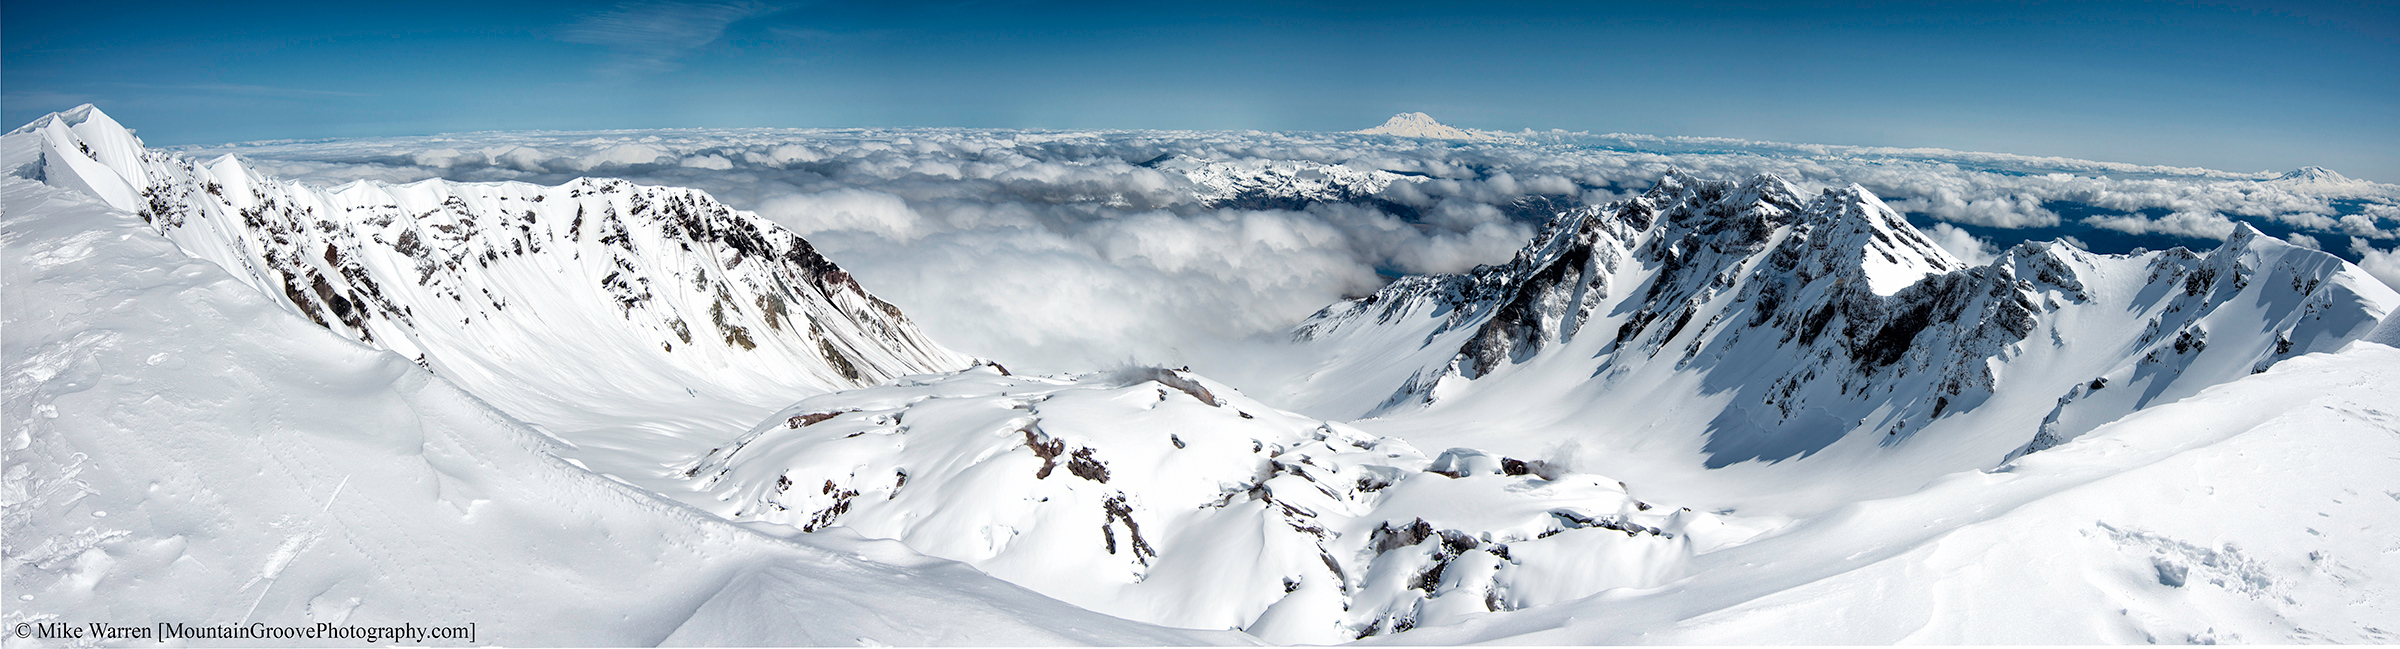
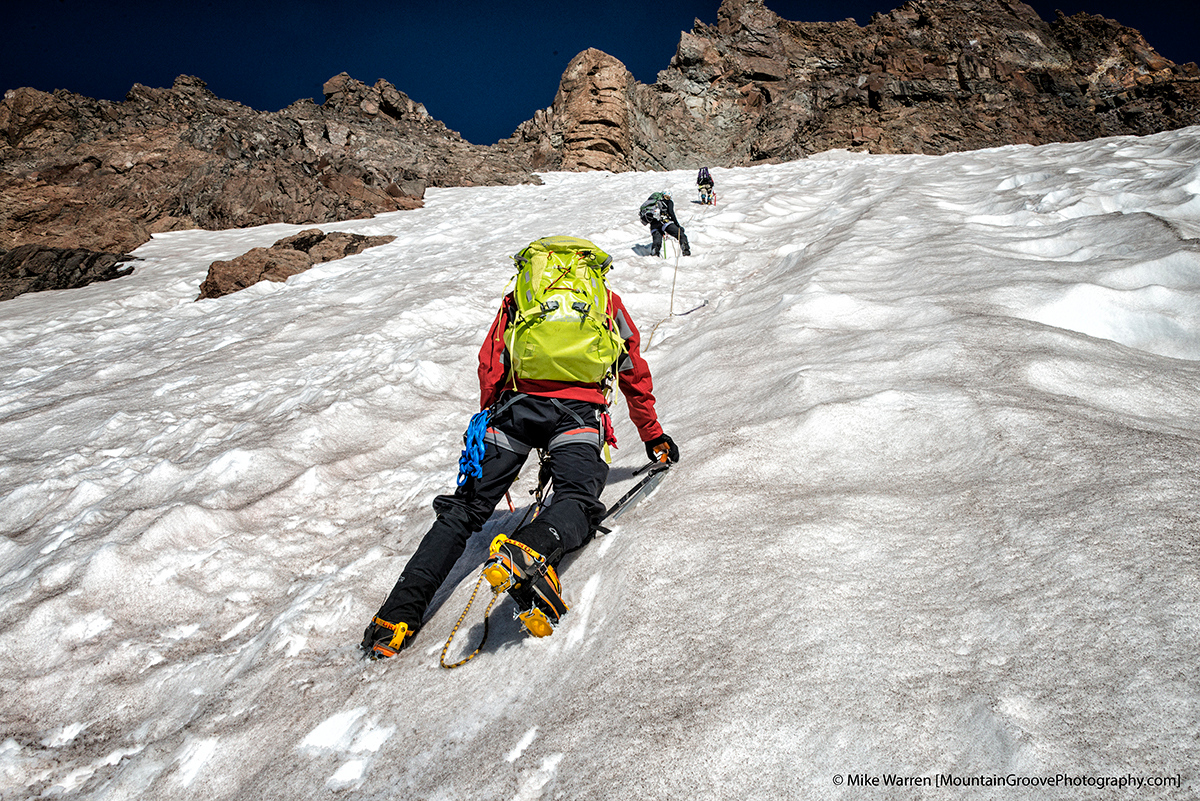
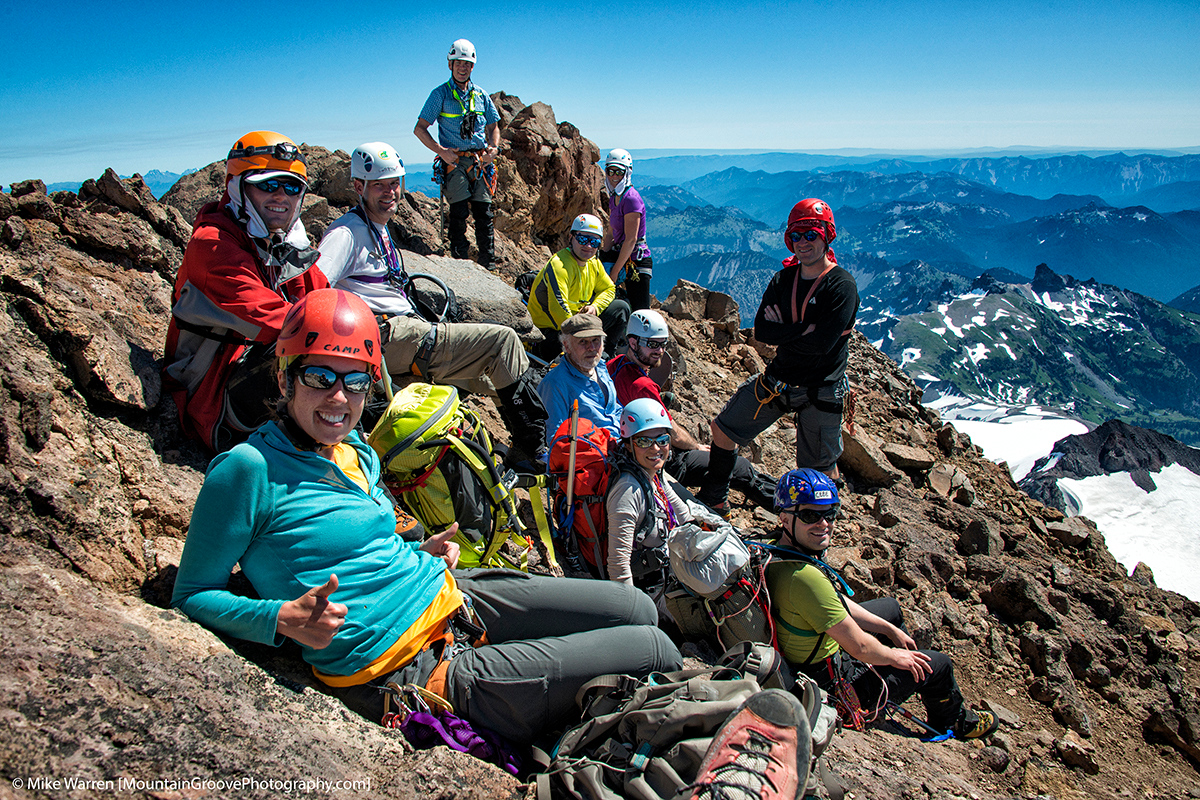